


Digital Publisher Guide
Digital Publisher Guide
Hello! Welcome to the Digital Publisher Guide. I've created some FAQ widgets that hopefully have some helpful information.
Any questions just ask me (Millie); millie.harvey@dnsw.com.au
Program/Platform Links
Sydney.com | Visitnsw.com Websites
Sydney.com | Visitnsw.com Websites
---
Sydney:
- Homepage: https://www.sydney.com/
- CMS access: https://www.sydney.com/user/login
Visitnsw:
- Homepage: https://www.visitnsw.com/
- CMS access: https://www.visitnsw.com/user/login
International Websites
International Websites
---
International URLs & CMS Access:
English speaking homepages are accessed via Sydney.com: https://www.sydney.com/user/login
The following countries are English language websites:
United States:
- Homepage: https://www.sydney.com/us
United Kingdom (has its own deals page):
- Homepage: https://www.sydney.com/uk
- Deals page: https://www.sydney.com/uk/deals
New Zealand (we will be creating a deals page within Sydney.com cms):
- Homepage: https://www.sydney.com/nz
India:
- Homepage: https://www.sydney.com/in
Singapore (has its own deals page):
- Homepage: https://www.sydney.com/sg
- Deals page: https://www.sydney.com/sg/deals
Malaysia:
- Homepage: https://www.sydney.com/my
Indonesia
- Homepage: https://www.sydney.com/id
Non-English sites are accessed via the INT site: https://int.sydney.com/user/login
They have a different prefix - so not "www.", but the abbreviation for that country.:
Korea
- Log-in: https://kr-int-prod.sydney.com/
- Homepage: https://kr.sydney.com/
- Deals page: https://kr.sydney.com/deals
Japan
- Log-in: https://jp-int-prod.sydney.com/
- Homepage: https://jp.sydney.com/
- Deals page: https://jp.sydney.com/deals
Germany
- Log-in: https://de-int-prod.sydney.com/
- Homepage: https://de.sydney.com/
- Deals page: https://de.sydney.com/deals
Hong Kong
- Log-in: https://hk-int-prod.sydney.com/
- Homepage: https://hk.sydney.com/
- Deals page: https://hk.sydney.com/deals
Taiwan
- Log-in: https://tw-int-prod.sydney.com/
- Homepage: https://tw.sydney.com/
- Deals page: https://tw.sydney.com/deals
China's URL is different than the others
- Log-in: https://cn-int-prod.sydney.com/
- Homepage: https://www.sydney.cn/
- Deals page: https://www.sydney.cn/deals
Alpaca
Alpaca
- Alpaca Platform Log-in: https://beta.alpacamaps.com/dashboard
- Alpaca Ticketing System Log-in: https://launchpad.37signals.com/bc3/4243802/signin
ATDW
ATDW
- Log-in: https://oauth.atdw-online.com.au/login
- Staging site (for testing purposes): https://oauth.contentstaging.com.au/login
Image Library
Image Library
Jira
Jira
---
Jira ticketing system is used for deals and if there's developer website jobs/bugs
Deals tickets:
https://destinationnsw.atlassian.net/jira/software/c/projects/IN/boards/61
(Link to Marji's spreadsheet: here)
Drupal - Dev team tickets:
https://destinationnsw.atlassian.net/jira/software/c/projects/DRUPAL8/boards/63
Monday.com
Monday.com
- Log-in: https://dnsw-force.monday.com/
Monsido
Monsido
- Log-in: https://login.monsido.com/login
Sharepoint
Sharepoint
Website Hierarchy
Website Hierarchy
Widget Index
Widget Index
Word Counter (copy for articles)
Word Counter (copy for articles)
Current Approver Account Login Details
Current Approver Account Login Details
Current Approver Account Login Details
For both websites:
- Username always: campaignapproval
- Password (changes every 90 days): contact Millie for the password
You may pass these details onto anyone both internal and external with no problems at all to approve content in the CMS that is not yet live. This is the only access it provides so there is no stress that any content can be modified in any way.
Instructions
Instructions
If you would like to send some instructions to the person using the account for the first time, you can send them this:
Once you have logged into the website, you will then need to click on the specific url/s you are trying to view that have content ready for review.
- Username: campaignapproval
- Password: insert current password
- Click on the URL provided to you that contains the unpublished content: insert the url/s here
- Once you have finished reviewing, log-out: https://www.sydney.com/user/logout
Publisher Access | Editor Access | Approver Account
Responsibilities & Access
Responsibilities & Access
There are a few different types of access accounts that exist within the CMS. This is for governance purposes and adhering to policies that DNSW needs to comply with.
Publishers = Digital Content Team members who are responsible for managing, maintaining and running the consumer website content for Sydney.com & Visitnsw.com. They can publish and/or archive.
Editors = Users given training who are outside the Digital Content Team and are responsible for making editorial copy changes to existing content in the consumer websites Sydney.com & Visitnsw.com. They cannot publish.
Approvers = Users with authority to approve content in the consumer websites Sydney.com & Visitnsw.com who do not need access to make direct changes in the CMS. Access is given to view unpublished content in 'draft mode'.
Publisher Access
These users can:
- create/build content, widgets, pages, articles
- edit existing content, widgets, pages, articles
- upload images & videos
- publish and archive all content
- approve or reject with notes content changes sent from editor accounts
These users cannot:
- change the functionality of the website
- change the physical specs of the website such as padding (white space), header specs, fonts, button shape etc
Editor Access
These users can:
- edit existing content such as editorial copy
- edit existing image captions
- send all content edits for approval to publisher account
These users cannot:
- publish or archive any content - it will always be sent for approval to the Publisher Accounts
Approval Account
These users can:
- view unpublished content in the CMS to provide feedback via Monday.com
- interact with unpublished content such as urls/images/videos & ensure they approve user journey
These users cannot:
- build/edit/archive/publish any content
User Account Creation
User Account Creation
No matter what level of access, if a new account is needed to be created in Drupal, you will need to log a ticket in Jira for the developers to action. Make sure you specify what level of access is needed.
Currently, the Project in Jira is still "Drupal 8" (even though we are up to Drupal 10) and the issue type select "Task".
An example of what would be submitted in Jira on a ticket is (pick from the list of relevant platforms):
Publisher account
Hello,
Can we please set up Millie Harvey before Monday the 21st November for the following? Access level is Publisher.
Email/user: millie.harvey@dnsw.com.au
-
Jira/Confluence
-
Sydney.com
-
Visitnsw.com
-
Int Sites
-
Slack
If it just for an editor account, you will only need the following:
Hello,
Can we please set up Millie Harvey before Monday the 21st November for the following? Access level is Editor.
Email/user: millie.harvey@dnsw.com.au
-
Sydney.com
-
Visitnsw.com
All User Login Details
All User Login Details
No matter what your level of access is everyone has the same place to log into the CMS
Those urls are:
Sydney: https://www.sydney.com/user/login
Visitnsw: https://www.visitnsw.com/user/login
For logging into the international sites please view the whole section on this Digital Publisher Guide page, titled: "Program/Platform Links"
"For Review" - The content team's QA approval process
"For Review" - The content team's QA approval process
If you are a Publisher and therefore have the delegation of approving content sent to you for review (either copy changes or widget/template changes) you can access all pending changes here:
Note: it is located once logged into the CMS under Content > For Review (1st option on menu)
Image Requirements & Specs + Header Video Specs
Image Specs: Headers + Copy
Image Specs: Headers + Copy
Whenever you need to send image requirements, you can include the following:
Header images:
Desktop: 3200pxl w x 1800pxl h
Mobile: 1000pxl w x 1800pxl h
File format: .jpg / .jpeg
No text or logo's on images
Copy images:
Min sizing: 3200pxl w x 1800pxl h - however anything larger is more than fine
Landscape orientation (portrait cannot be included)
File format: .jpg / .jpeg
No text or logo's on images
Header Video Specs
Header Video Specs
Format & Specs:
Mp4 file format
Desktop specs: 3200 x 1800 – file size up to 32mb
Mobile specs: 1000 x 1800 – file size up to 20mb
Length:
We recommend for a header video no longer than 15 seconds, and it’ll loop continuously. Anything longer than this will cause load issues.
For a visual example: Visitnsw.com homepage header example: http://www.visitnsw.com/ (no text within video, has text and logo as separate overlays).
Text in video:
It’s best to not have any text in the video file itself and if needed we can add a separate overlay.
Logo's:
We can add a logo over as a separate overlay, not within the video file.
Image use tracking/removing an archived image from the CMS
Image use tracking/removing an archived image from the CMS
If you need to track where an image is displaying across the site we now have the functionality to bring up a list view.
Process:
- Search for the media in either Sydney or Visit.
Note: if you're archiving an image, you should search both sites regardless of what the image is of because in lots of instances there's cross-promoted content and the image could have been uploaded for a tile or supporting piece of content. - Click to "edit" the image (right-hand side)
- Click the "usage" tab:
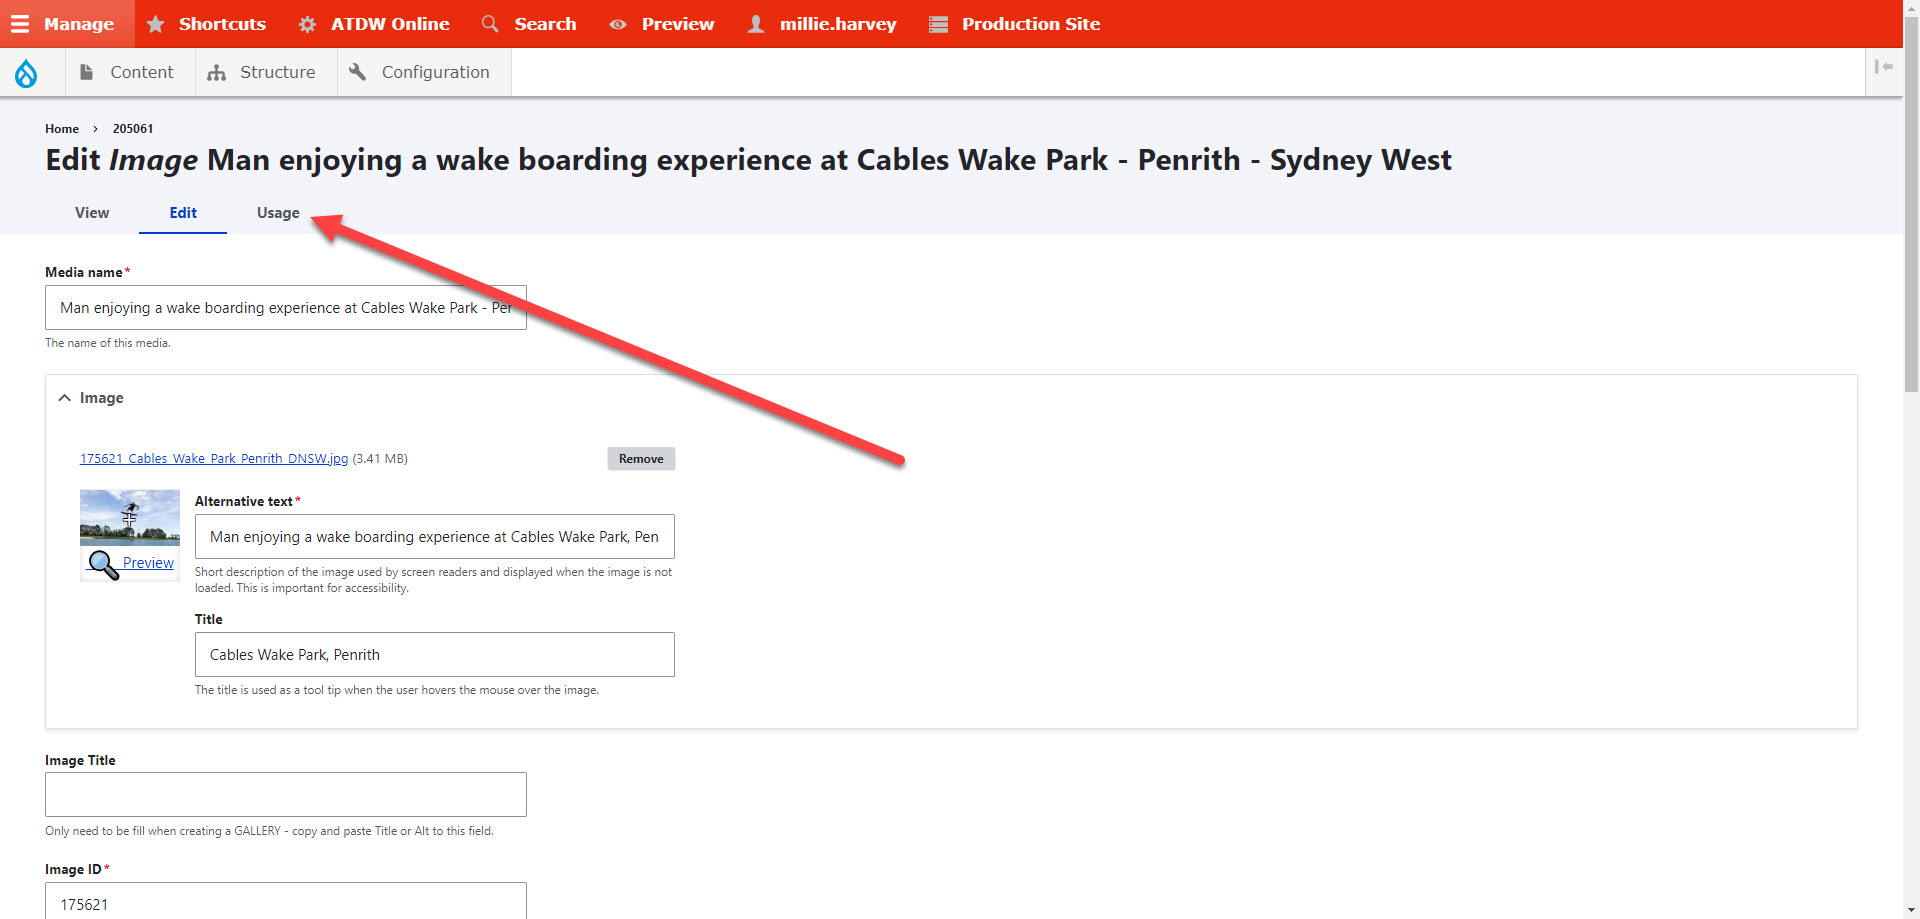
- The "usage" tab will now display a list of results that the image currently appears in. In the "entity" column is the widget/node and based off our naming convention you'll be able to tell which page this is located on and the section to look for. E.g. in the below example, you can see the image appears in two places. The first one is unpublished, so you wouldnt need to replace this (it should still be deleted though), but in the second listing, it is currently live on the page titled "Fun and adventure" so before you request to have it deleted, you should replace it with something else that is relevant.

- You can then either click directly on the "entity" url and get taken to the widget/node specifically and replace the image, or you could open a new tab and go to the content section and locate the page the content is on and replace it that way. Although it takes longer, it's better to do it this way by going onto the whole page so you have context of the entire page and don't replace the current image with something that's already on that page live.
- Once all the locations have been replaced for the image, you'll have to log a jira ticket for the dev team to delete the image permanently out of the cms so there's no confusion. If there's multiple images you can list them on the one ticket.
An example of the information that's required on the ticket: https://destinationnsw.atlassian.net/browse/DRUPAL8-3577 | Josh has required there's always a URL to the media itself avoid any confusion. The url needed is the one that appears when you click to view the image: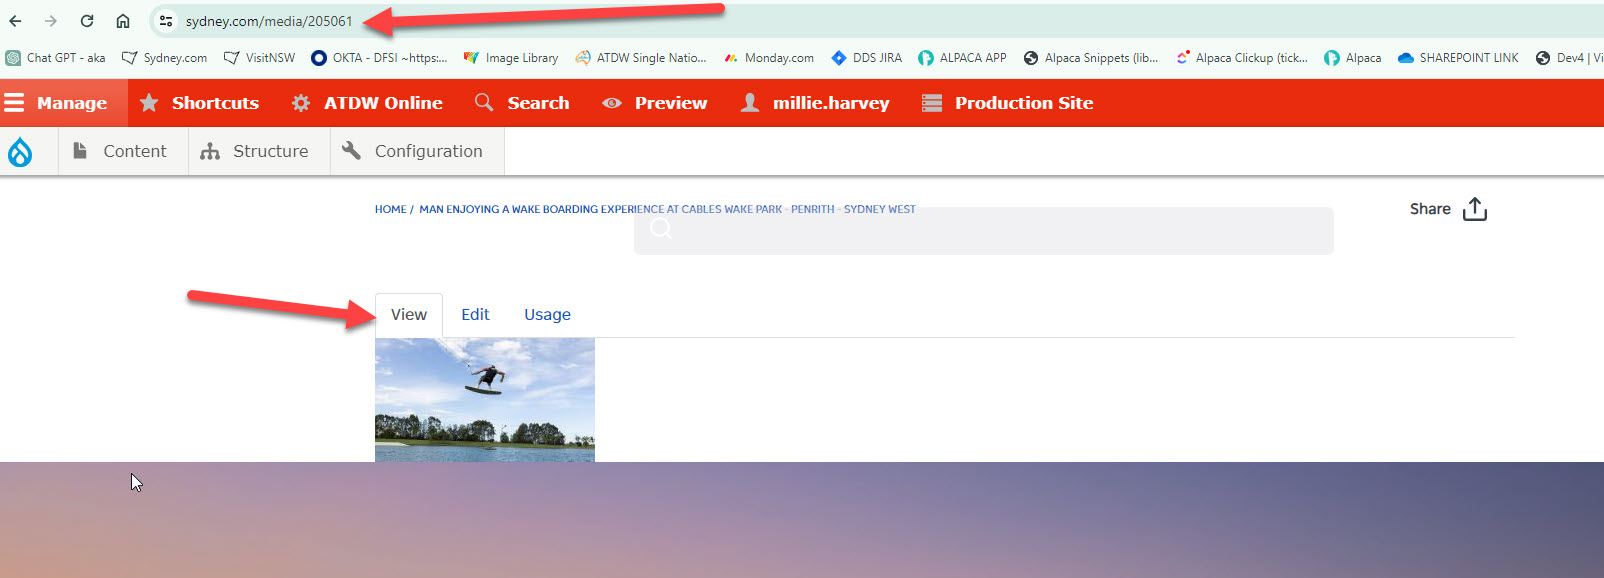
- Josh will let you know when the image is deleted, you can then delete the archived image email.
Content Creation
Pages
Pages
-
Content > Add content > Page
Notes:
- Title* = backend only - displayed in Breadcrumb on page
- Widgets should all be under "Widget Bottom" for full width (pink section)
- Slug = last part of url after the final /
- Analytics Page Type* = how we report on pages
- Geo Location = for Favourites Page map
- Menu Settings = for page mapping > parent page
- Meta tags = SEO
Images: Body Copy & Tiles
Images: Body Copy & Tiles
-
Content > Media > Add Media > Image
If adding the image into copy
- Go to the spot you need to add in the image and create the new line break
- Select the "E" icon:

- Type the specific media name, select the media when it pops up
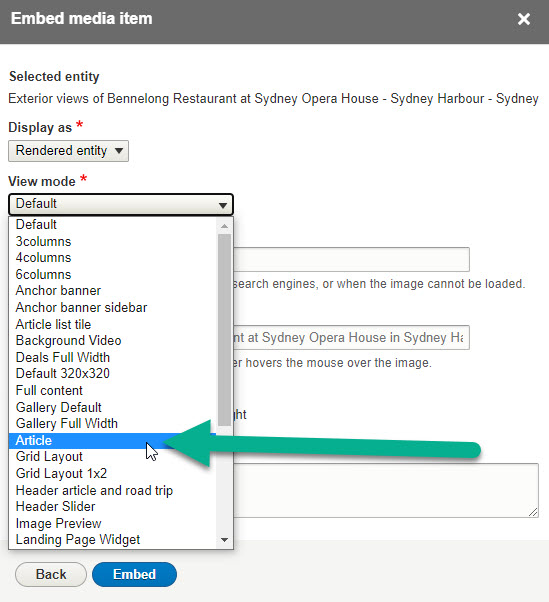
- You will then need to select "article" as the "view mode*" so the image displays in the correct specs:
- Never select the icon "image" directly in the copy - it doesn't have any of the necessary content fields so we would never be able to track the image in the system:

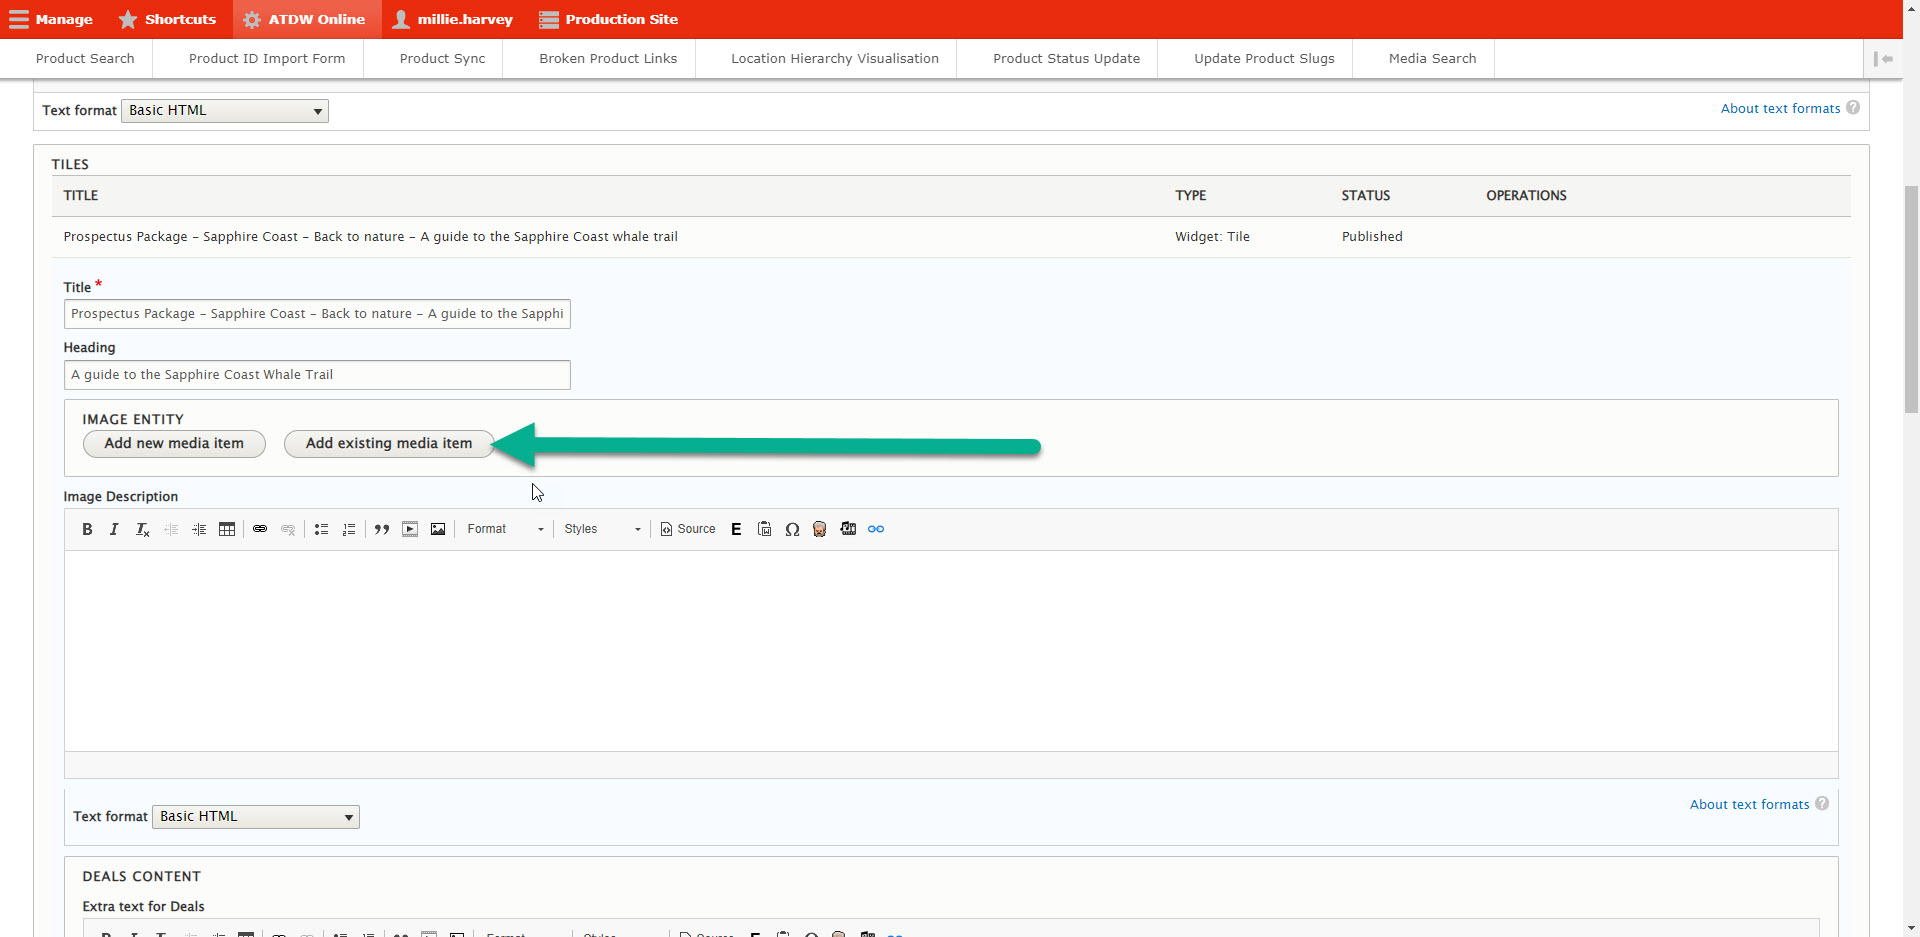
If adding an image to a tile
- You can add the image directly in here as all the fields will populate - "add new media item", or if one exists already just select "add existing media item" and type in the specific media name:
Notes:
- There are thousands of images uploaded in the system - to save time do a quick search of the image before uploading (Content > Media > Media Name)
- Every image media name must be different from the others, otherwise you will cause a bug in the system and the wrong image can get pulled through.
> It doesn't matter if it's as small as saying "blue sky" or "bright sun" or just literally any differentiating point
E.g. Man crossing bridge at Treetop Adventure Park - Tuggerah - Central Coast - Please refer to "Naming Conventions" on this publisher guide page for information on how to name images, however in summary:
If possible - whatever content piece you're working on, whether it's copy | a tiles container | an image | any widget | a tile;
Media Name = Back-end of CMS - producer use only
Image Caption/Article Image Caption = displayed to website user
Header Images
Header Images
-
Go into "New draft" then the header container > "Add new media item" > make sure it is the correct media type e.g. "Header article and road trip - image" vs "Header content section - image"
-
Events page = "Header content section - image"
Events Header Image Diagram
Events Header Image Diagram
ATDW Links in Copy
ATDW Links in Copy
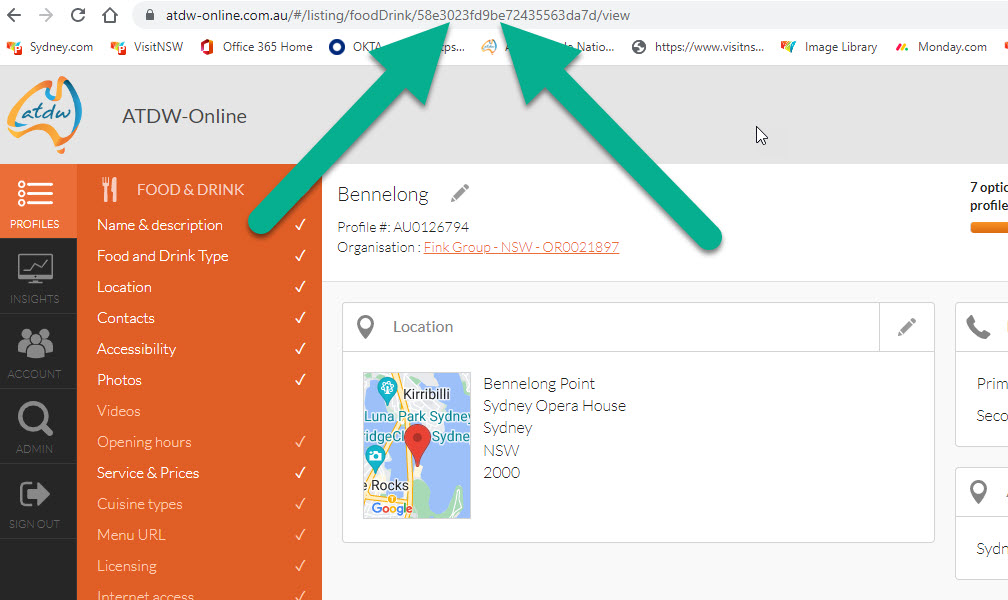
Wherever there is a link in the copy that's to an ATDW listing, use the little "hodor" icon (yes from GOT) in the editor bar to do so:

You can type in the business name into the bar, however sometimes multiple listings have the exact same name (this will happen say for example if one listing is a tour vs one is an attraction, or there is an old archived listing with the same name that still shows up):
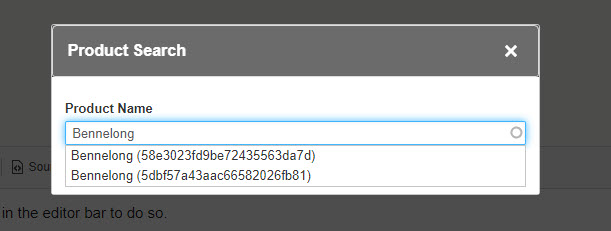
If this happens, you can find the correct ATDW ID number from the ATDW platform in the listing's url (different from profile number #):
Article Tile Shortlist (named Travel Inspiration)
Article Tile Shortlist (named Travel Inspiration)
1. Create Widget: Article List
2. Title* = always the name of the page you're creating the widget for, followed by '- Travel Inspiration' (or if it's titled something else, call it that)
3. "Heading" = whatever is written in the brief - e.g. "Travel Inspiration"
4. Link = leave this blank
5. In the "Article List" drop-down, choose "Articles List (Short)"
6. in "Article View Mode" drop-down, select "Promoted Articles"
7. Type the names of the articles you want pinned in the "Promoted Articles" field with a comma in between each one.
Note: The name of the article will be the page title of the article - so not the displayed heading, and not the url. This one:
8. If you haven't been given any names of the articles, and it's for a region/area/town, just enter the relevant info into the destination fields
9. In the "count" field, please make the number 3.
Saving images from ATDW
Saving images from ATDW
The reason we do it this way is because if you don't take the original file from the code using the below instructions, the image will save at a much much smaller size and be poor quality on the website.
- In the ATDW listing, go into “Photo’s”, which sits in the vertical orange bar on the left hand side
- Click on one of the images you want so it appears in a larger size above the rest of the gallery
- With your mouse over the image, right click, and click on “inspect”
- A bar will appear on the right hand side of the screen. At the top of this bar, you’ll see “sources”. It should be the third option along. If you click that, there’s a drop down of heaps of options
- Click on the one that has an icon of a cloud and then says: “assets.atdw-online.com.au” – this is just you accessing the code of the database, and then you’ve now navigated to where the files are saved.
- Click on the “images” folder – all the images will appear in a long list. If you click through each one, you’ll see what image it is.
- Find the one you’re after and right click and open in a new window.
- In the url at the top, just backspace out the characters that appear after the “.jpeg” or “.jpg” – the characters are just making your image appear smaller than it really is. By backspacing that out you can see the quality of the image at its full size and then save it to your own files
- You don’t have to start from scratch per image, you can just go back to that list of images in the sources bar
- Naming the image - when you upload it into the CMS, the Name* field should always start with "ATDW - name of the listing" and the credit should always have both the photographer and the owning organisation.
Note: if you get sick of having to scroll through that super long list of images to choose from, refresh the webpage, and it’ll return the image results list from just the profile of the page you’re on
Here is a visual chart of the instruction steps 1-7:

Create an online public document
Create an online public document
-
This is when you need to create a document that is not a downloaded attachment, but rather an online document with a URL, which is accessible by anyone/the public (not just DNSW staff).
By using this method, as a word document, you are able to continue editing content, without needing to produce a new URL for every update/change.
Only the owner of the document will have editing access.
An example I have created, are these instructions as their own document: https://docs.google.com/document/d/e/2PACX-1vS1-ALvDNEE-EANLWDXruW-Is7ro5ThVHJUMwCKIbpJLSus9J0kGRp3ZBhIvduY-w/pub
I can also make the URL look prettier, without the ID showing and just hyperlink text. For example, click here.
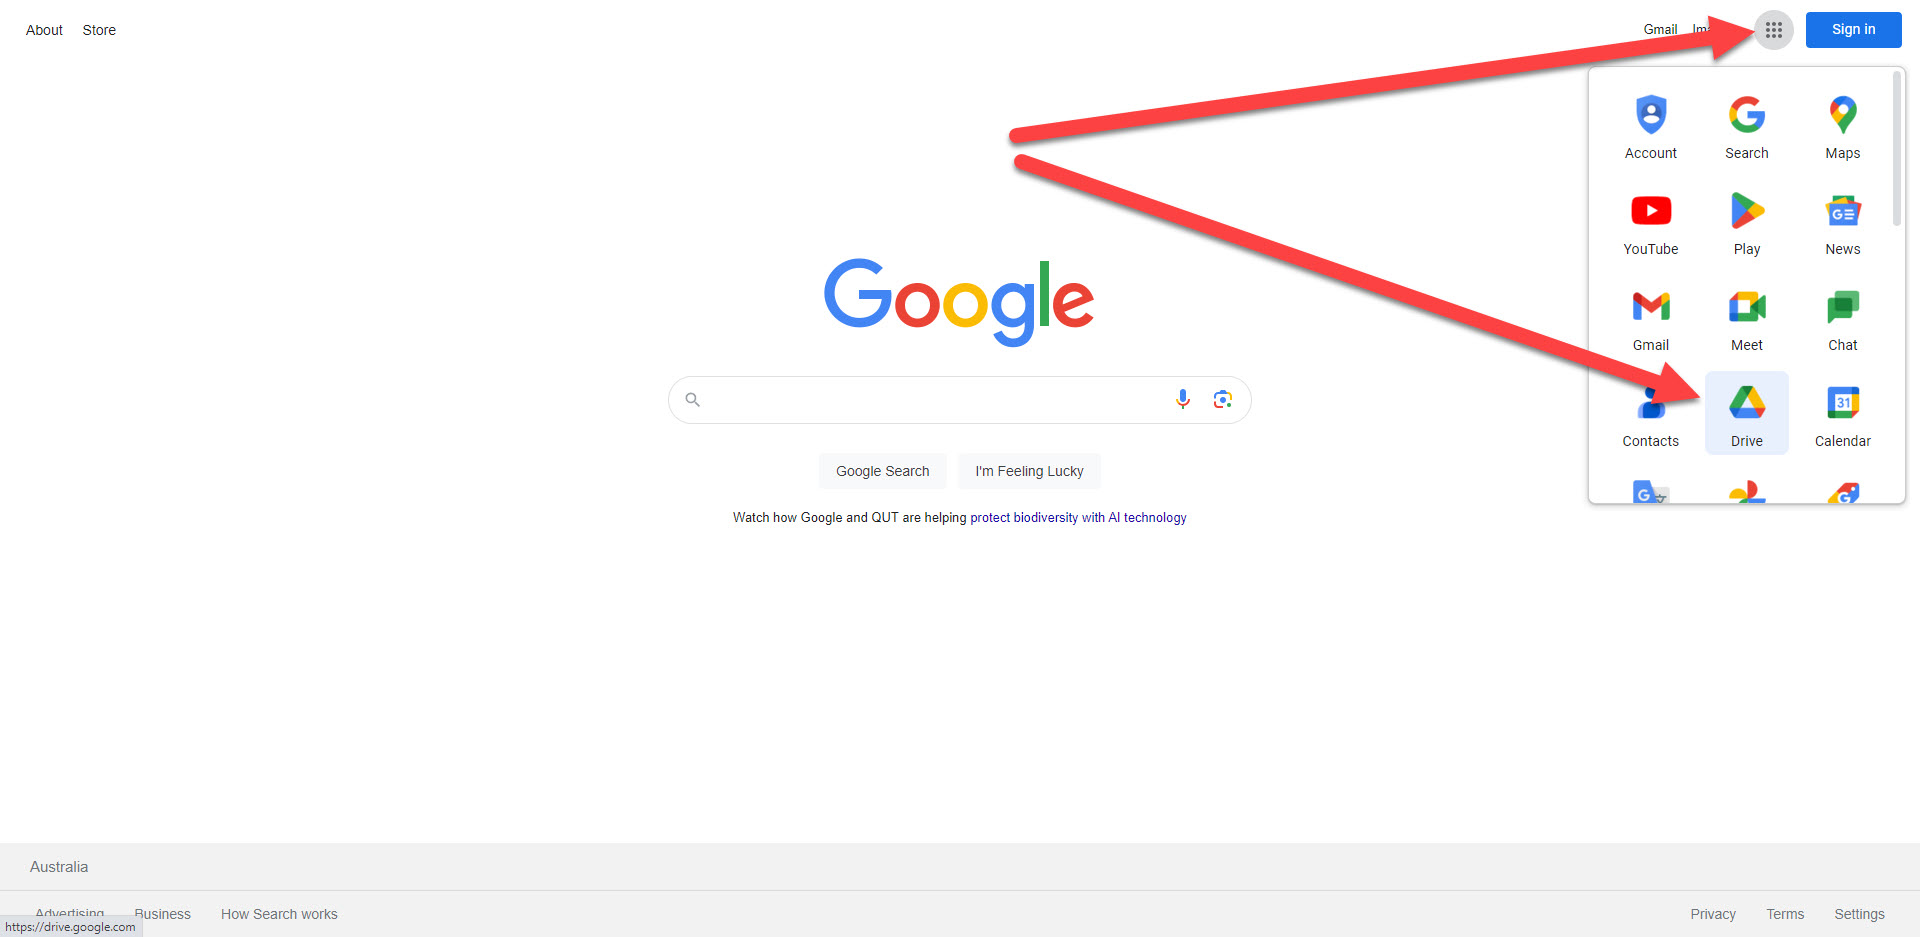
Steps:
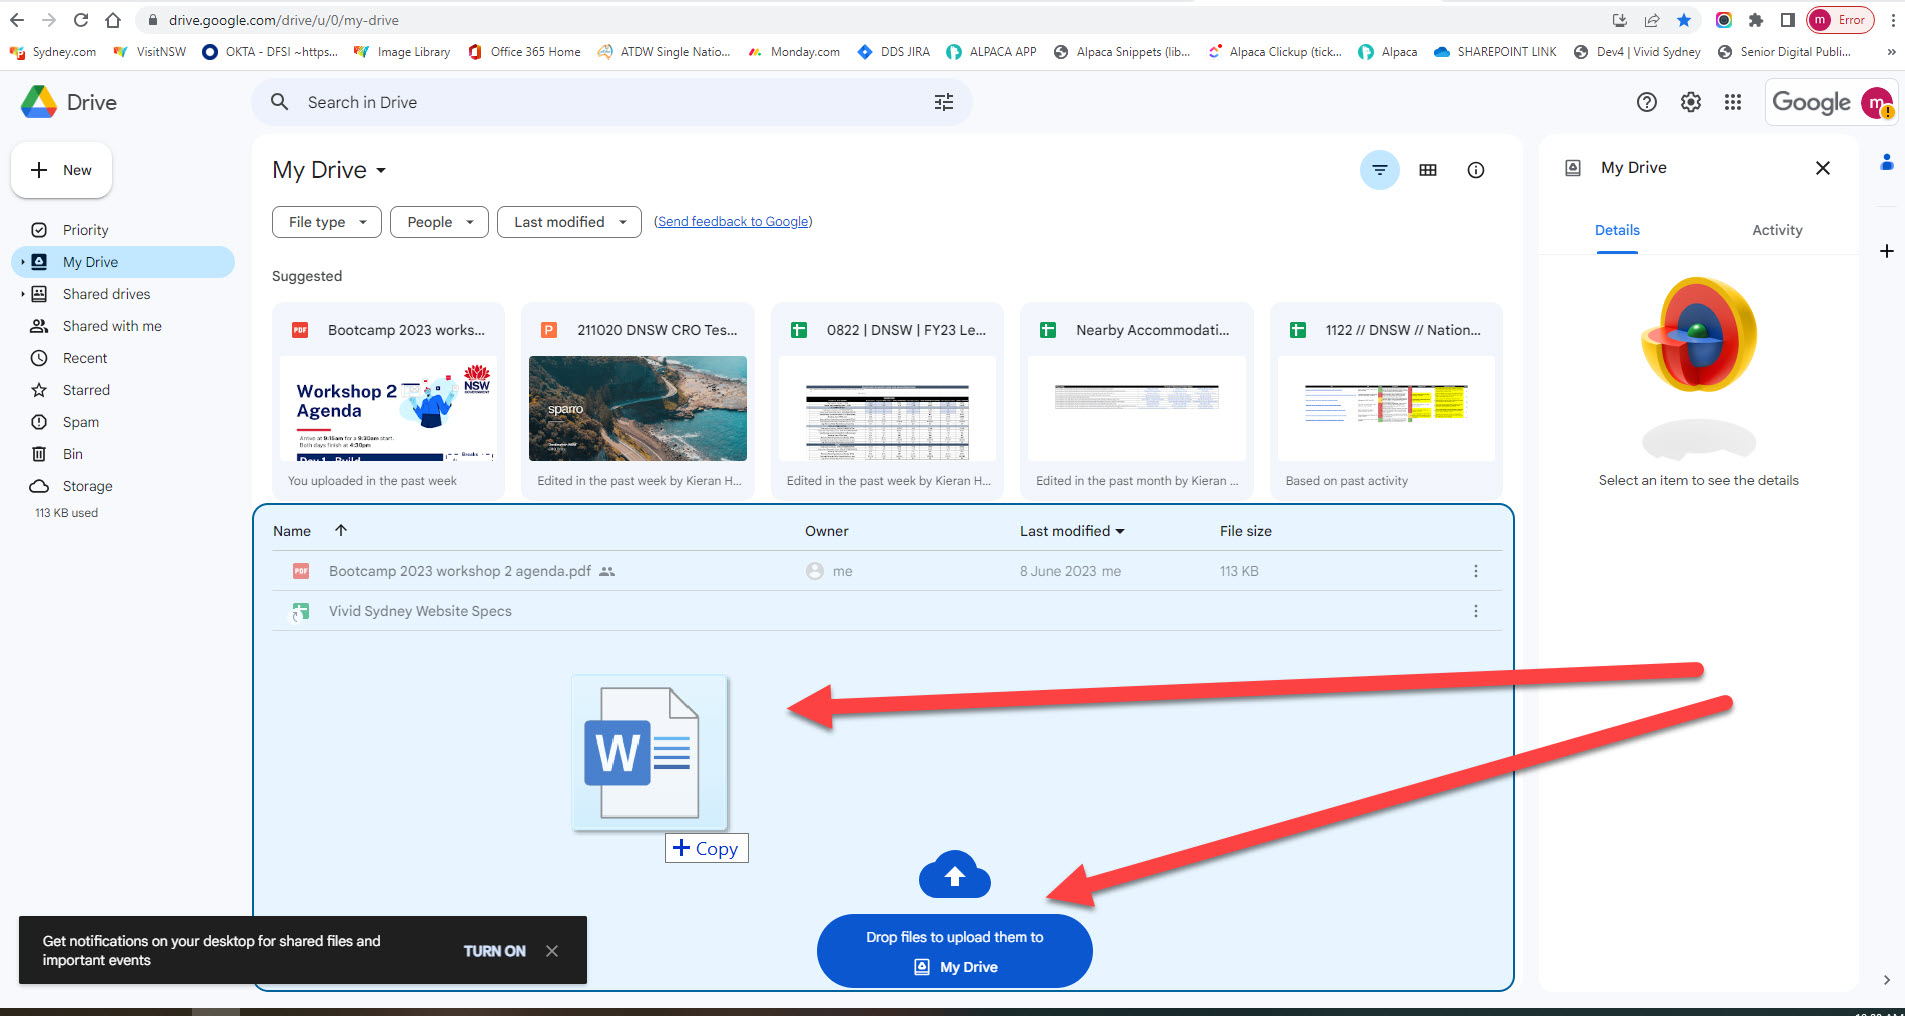
1. Go to google drive - you can use your DNSW email. If you go to www.google.com, you'll see this view.
2. Have the document saved to your desktop, then drag and drop into your Google Drive account. As mentioned, these instructions are for a word document only:
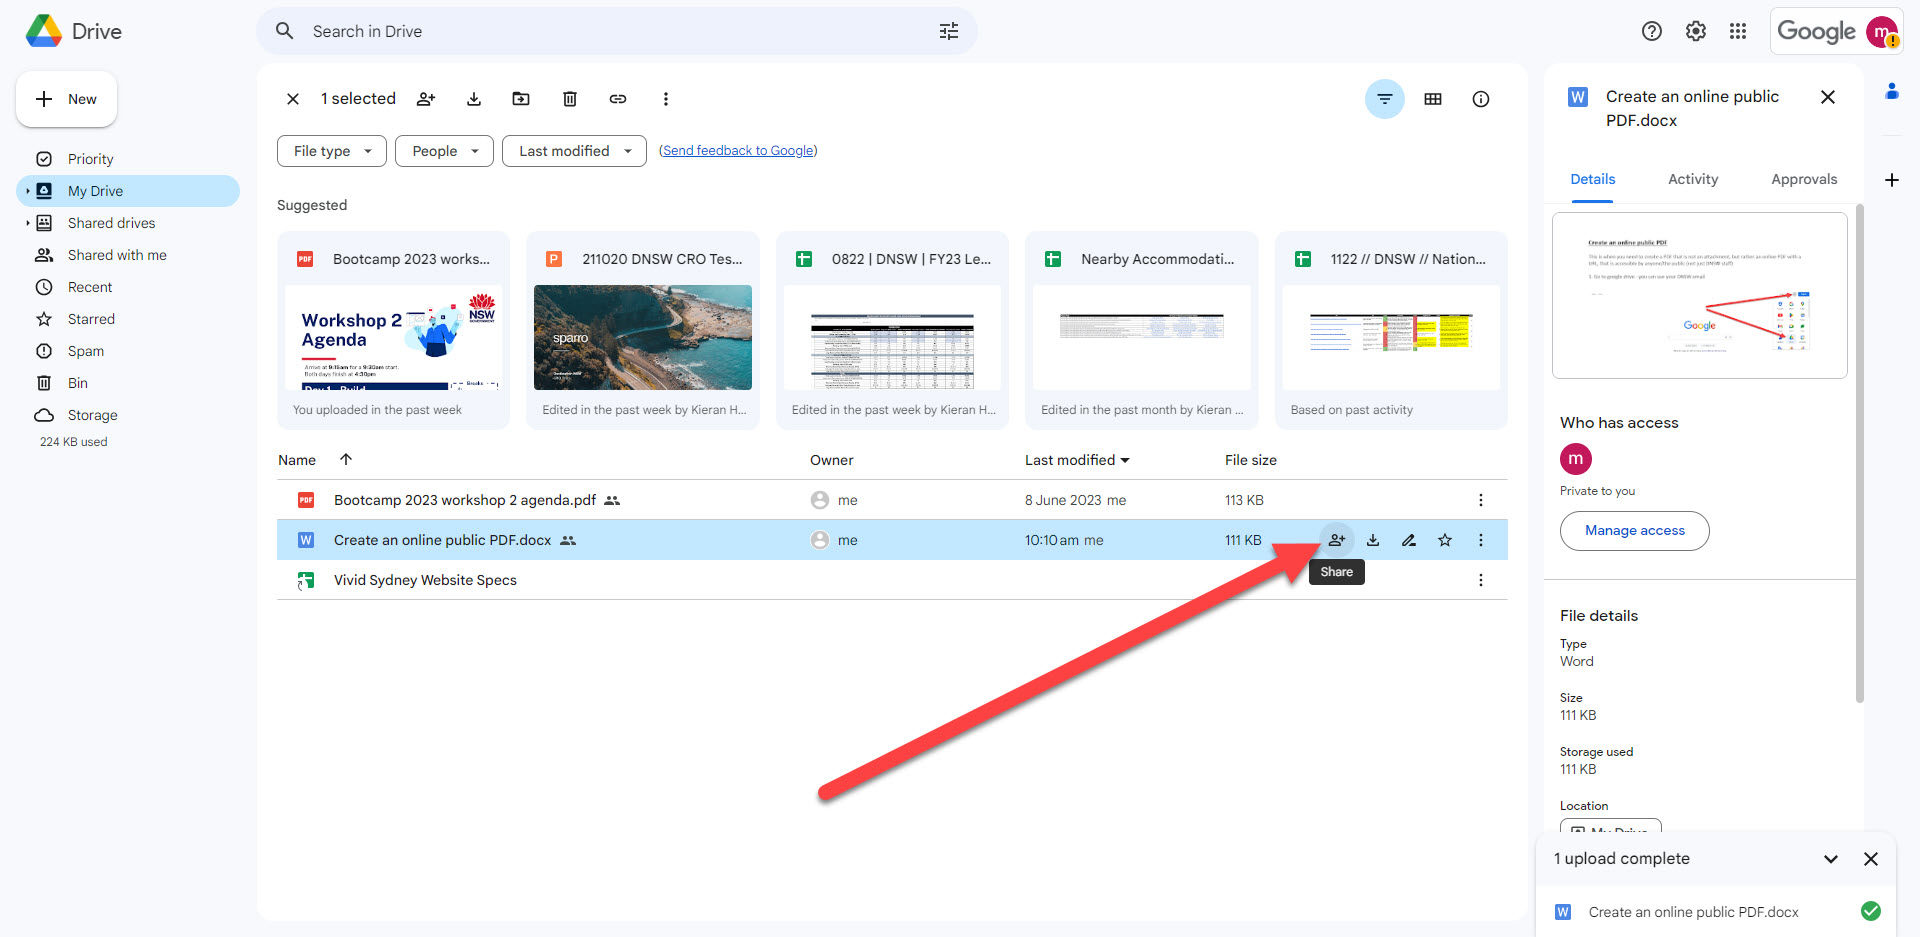
3. From your google drive list view, and click on the “Share” icon:
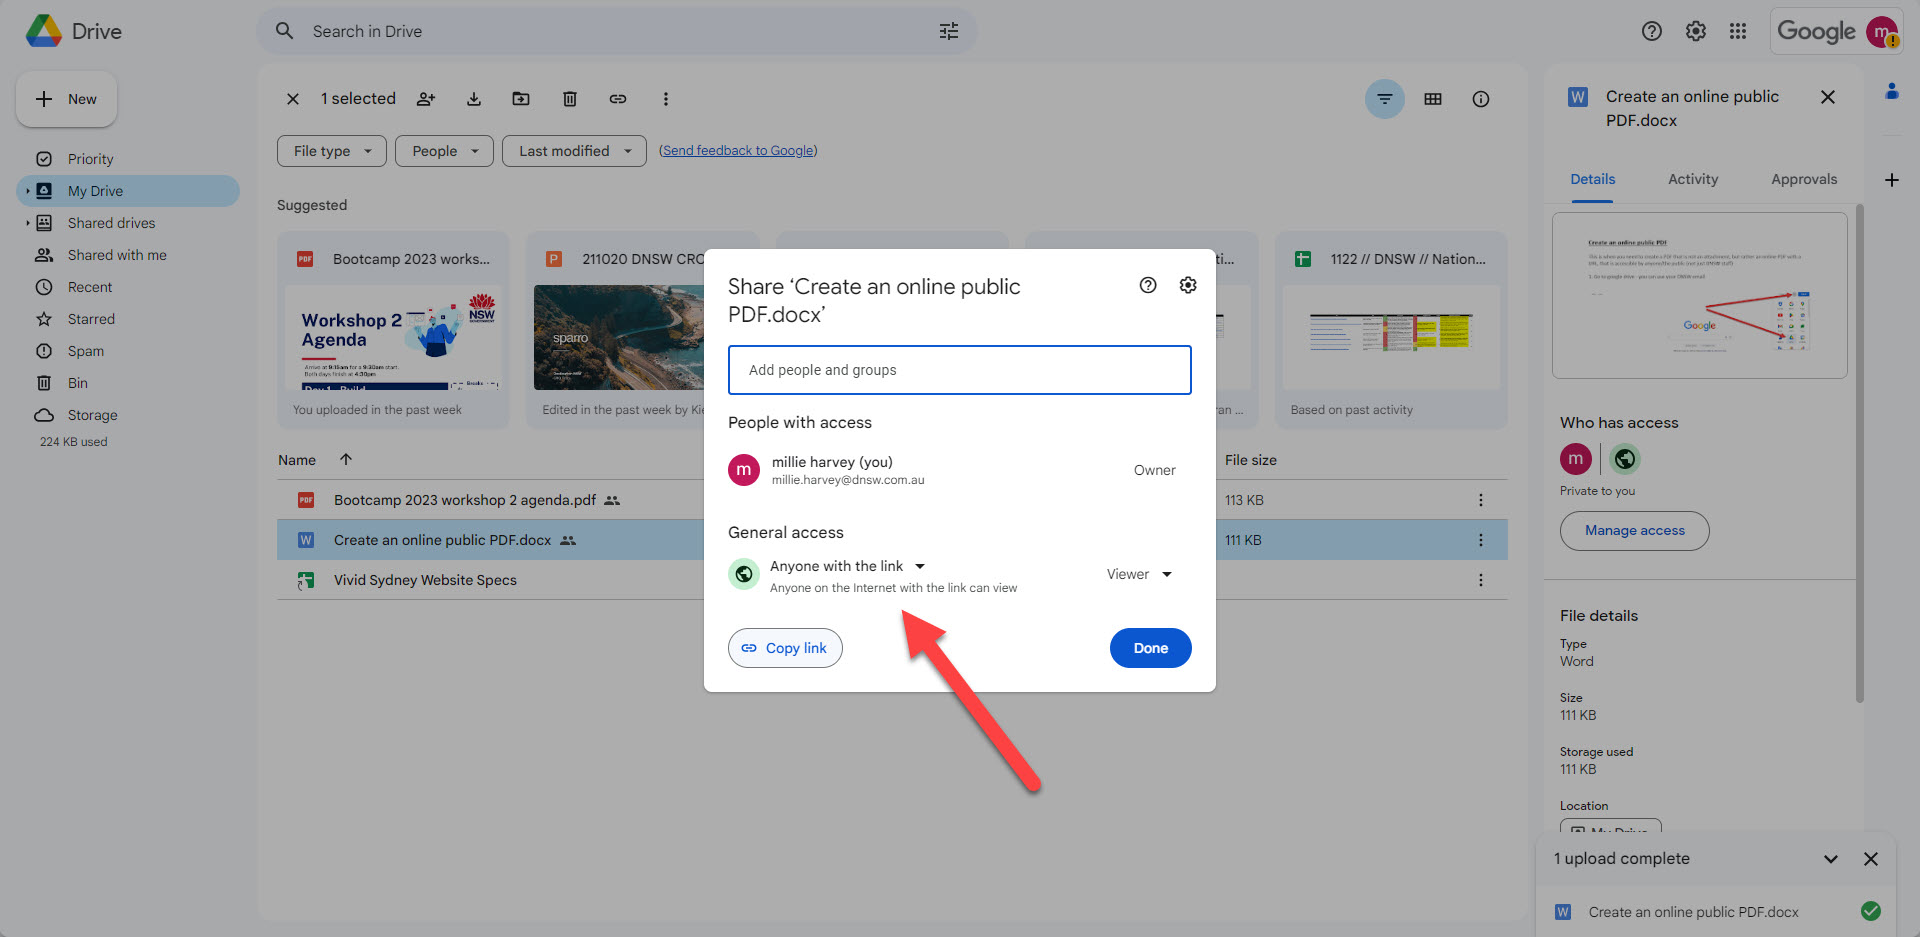
4. Set the access to: “Anyone with the link”. This means it’s public (for viewing, not editing).
5. Open the document, and make any changes that you need to. You can do this as many times as you would like to. It does not matter how many changes you make, or when you make them, including after this document has been published.
We are now ready to publish to web (nothing will happen, it just means you can provide the URL to Millie, who can then publish it onto the Sydney.com page. So until the URL is on the Sydney.com page, the document still isn’t out in the world).
6. Open the document from within Google Drive, and click File > Share > Publish to web.

7. Copy the URL in the Link field:
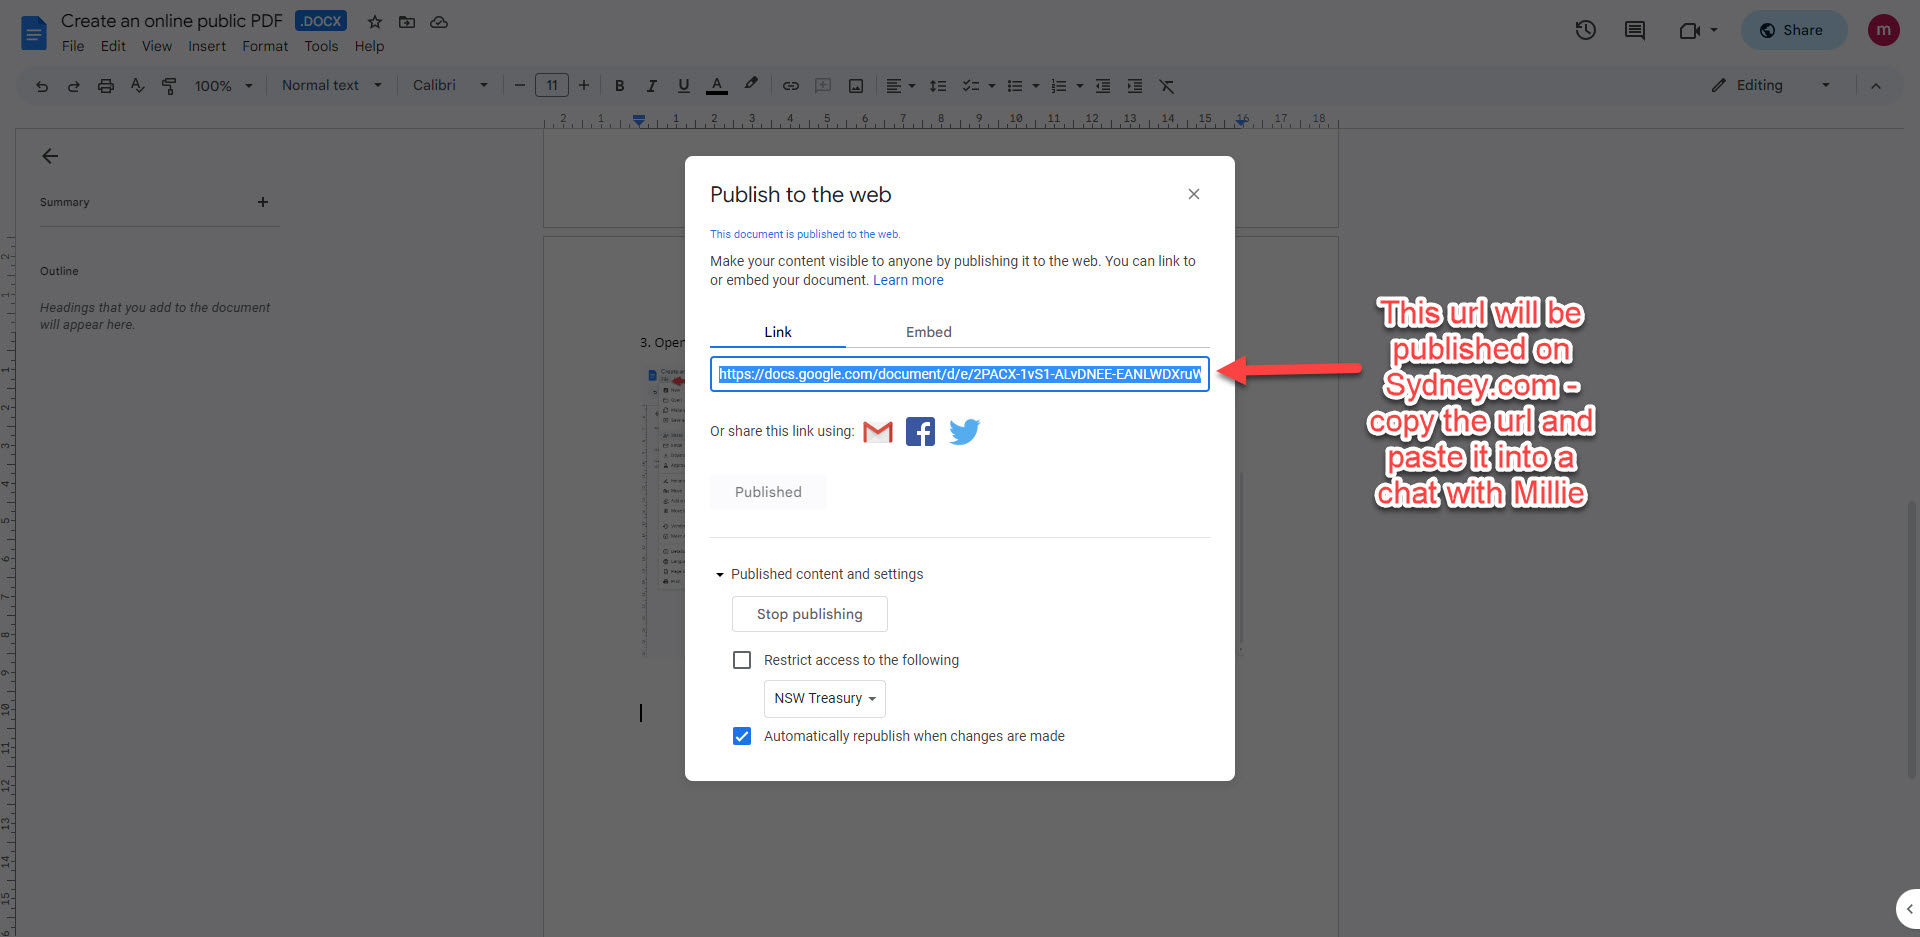
Send this to Millie.
You can test this URL too if you would like, by sending it to anyone directly to view it.
The public will not have access to edit the document, only the owner of the document has access for editing.
A reminder: you can still open the document, and make any changes that you need to. You can do this as many times as you would like to. It does not matter how many changes you make, or when you make them, including after this document has been published.
The updated content will appear for the users viewing the information.
Product lists
Product lists
To build any type of product list, you can have a look at all the different display types from the link below, and then copy the same settings from the example:
Emergency Warning Widgets + Banner
Emergency Warning Widgets + Banner
Visitnsw.com
If you need to add an emergency warning, take the widget: "Christmas Holiday Period Emergency Widget - traffic congestion - include "Fire Widget CSS" and copy everything into a new widget
Meaning you need to build a "Widget: Text with Image" widget and then make the display setting "Emergency Module LEFT Image" - you then add that to the page but you also must add on "Fire Widget CSS" as an existing widget/node to the page too. If you do not do this, it wont be formatted correctly.
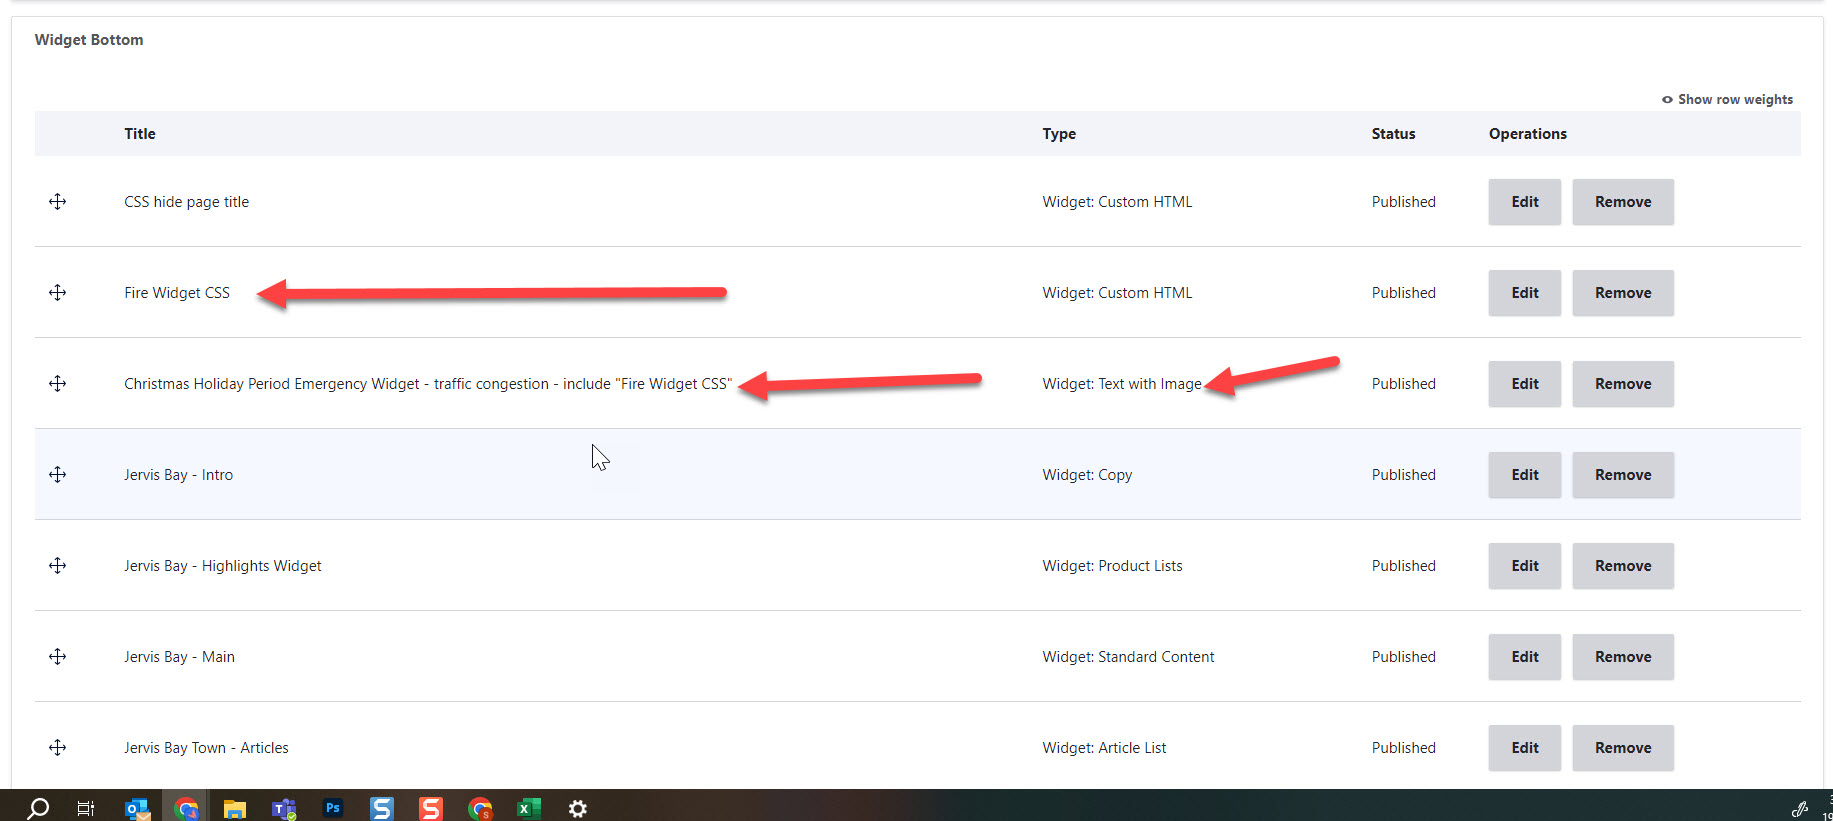
Sydney.com
Sydney.com does not operate the same as Visitnsw.com - you do need to build the "Widget: Text with Image" but then you need to also add the "Emergency Warning Widget CSS" as an existing node/widget to the page as well for formatting.
If you get stuck, ask Millie/Marcelo
COVID ALERT
This is titled "Covid Alert" but this is for the Yellow Emergency warning strip that goes at the bottom of all headers across the whole website in times of a crisis. If you need to edit this, you can ask Millie, or Marcelo, or if you have a access you can edit this page:
Naming Conventions
High Level Summary
High Level Summary
If possible - whatever content piece you're working on, whether it's copy | a tiles container | an image | any widget | a tile;
Page Name - What it is - Specific Identifier
- E.g. Homepage - Things to do - Musicals
- E.g. Events Landing Page - Promoted Product Widget
- E.g. Header - Waterside restaurants in Sydney - Berowra Waters Inn
- E.g. Spit Bridge to Manly Walk - FAQs - Fast Facts
Images - Media Name & Image Credits
Images - Media Name & Image Credits
---
Media Name = Back-end of CMS - producer use only
Image Caption/Article Image Caption = displayed to website user
Media Name*
Tip: always avoid a comma: ',' in the media name - the back-end won't recognise when trying to search
Header images:
Start with always including "Header" in the name - this is because these are uploaded as a different media type, and we can't pull in one image into multiple locations (which we can with all other images). Then follow after the "Header" with the Page Title, then whatever the image is of
E.g: Media Name*: Header - Sydney Restaurants Outdoor dining - Watsons Bay Boutique Hotel
DNSW library images:
We can pull these into multiple locations across the website (body copy and any tile). Image only needs to be uploaded once.
Start with what the image is of (as simple/specific as possible) - followed by the location town/area - followed by the region
E.g: Media Name*: Woman enjoying food and drink at The Boat House - Palm Beach - Sydney North
Images sourced from ATDW:
Include ATDW at the start - this is so we know to only use it against their product, then just the image information
E.g: Media Name*: ATDW - Pier One Sydney Harbour - Admiral Suite Bathroom
Article Image Captions:
Name of the business/activity + Location + Always include an image credit if not DNSW. Formatting is - Credit: *the photographer*, *if there's also an organisation*
E.g. Sydney's Open For Lunch - YCK Laneways - Credit: Cassandra Hannagan
E.g. Admiral Suite Bathroom at Pier One Sydney Harbour - Credit: Dave Wheeler, City of Sydney
Widgets
Widgets
---
Copy widgets:
These are used for the centre aligned copy as the introduction to most editorial pages
When naming the "title*" of what will be displayed in the backend, begin with the page name it is living on, followed by what piece of content it is, e.g. "intro" or "main" or "Getting around" etc
E.g. Digital Publisher Guide - intro
Standard content widgets:
These are used for the full length copy on editorial pages. Name is the same as above - page title - content piece
E.g. Manly - Main
Tile Container widgets:
When naming the "title*" of what will be displayed in the backend, begin with the page name it is living on, followed by the name of the tiles container (so the subject/group)
E.g. Adventure & Sport - Outdoor activities in Sydney
Tiles:
When naming the "title*" of what will be displayed in the backend, begin with the page name it is living on, followed by the name of the tiles container (so the subject/group), followed by the name of the tile
E.g. Adventure & Sport - Outdoor activities in Sydney - Walks & Hikes
Website Page Templates/Page Types
Article
Article
- Landing page: https://www.sydney.com/articles
Three different templates:
- Listicle: 9 secret Sydney spots
- Itinerary: A 72-hour nature staycation on the Northern Beaches
- Standard: What to do in Sydney in winter
Located in the CMS to build: Content > Add content > Article
Briefs
Each brief provided for an article is exceptionally detailed, so follow the brief provided to you and enter in the information to the corresponding and labelled data fields.
You will be given the categories, locations (need to match the location hierarchy, meaning you can't list a town that doesn't exist in our CMS. Type in the name and if it exists it will appear in the dropdown), content, image options, titles, meta data, analytics information etc.
The only info you most likely won't be given is the reading time, which you can copy and paste the body copy from the brief into this website and then look at the 'Reading Time' that's listed on the right hand side panel: https://wordcounter.net/
You also will by default always just make the author "Destination NSW", which comes up if you click to 'add existing author'. The date & time of publishing should be the date and time that it is when you're building the article. You can change this if needed in the future.
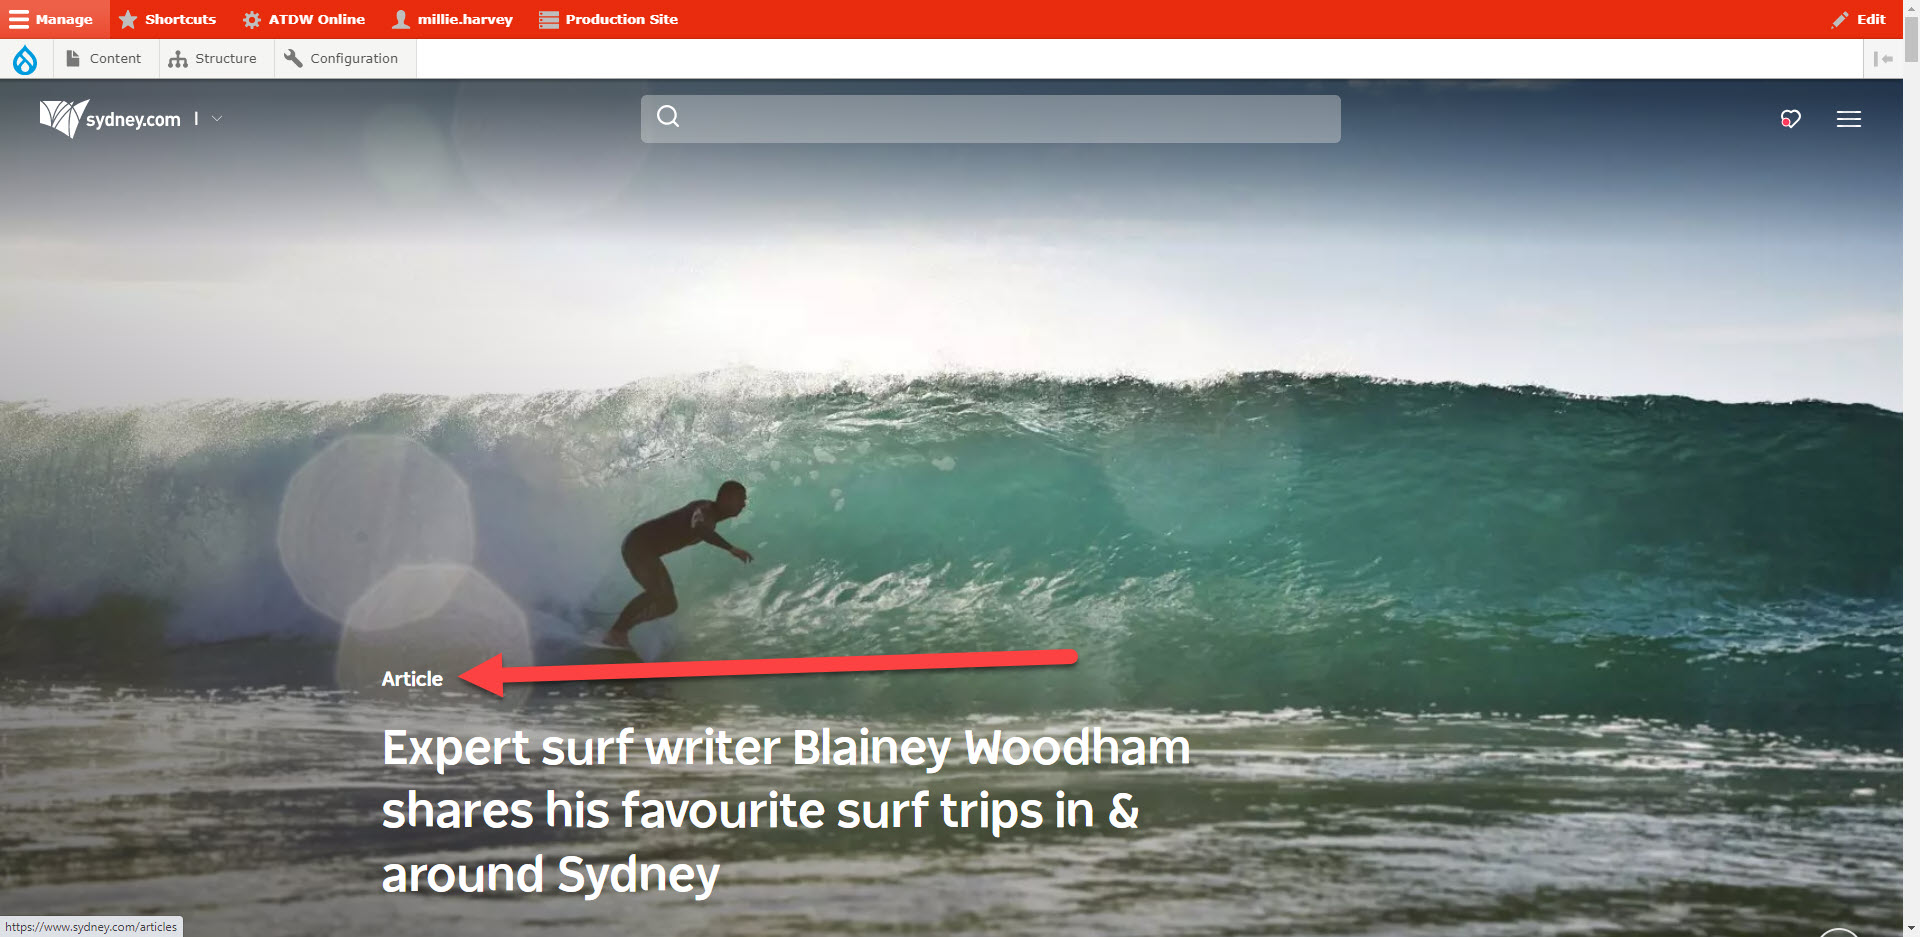
Navigation for the user
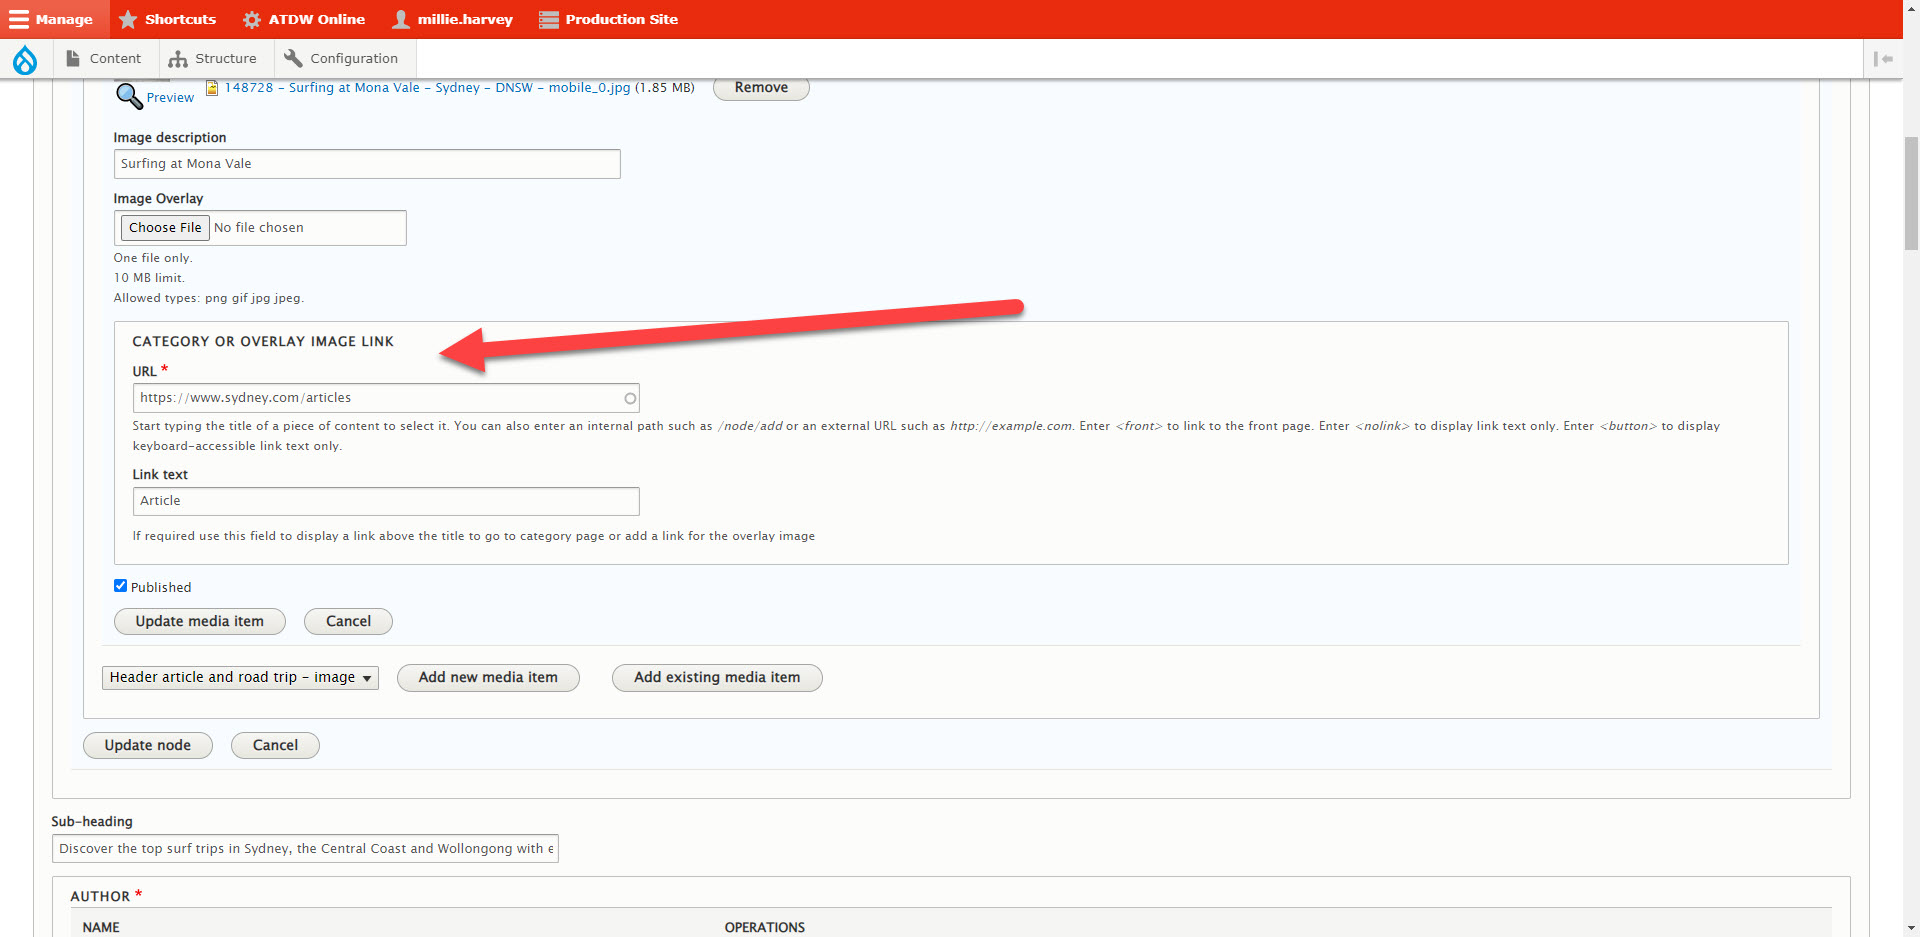
The link that lives within the header, so field titled "Category or overlay image link", should always be *Link Text: Article | URL: https://www.sydney.com/articles or https://www.visitnsw.com/articles:
It appears like this on the front end, so is consistent as a navigational tool for the user on every single article:
This is how it appears in the backend:
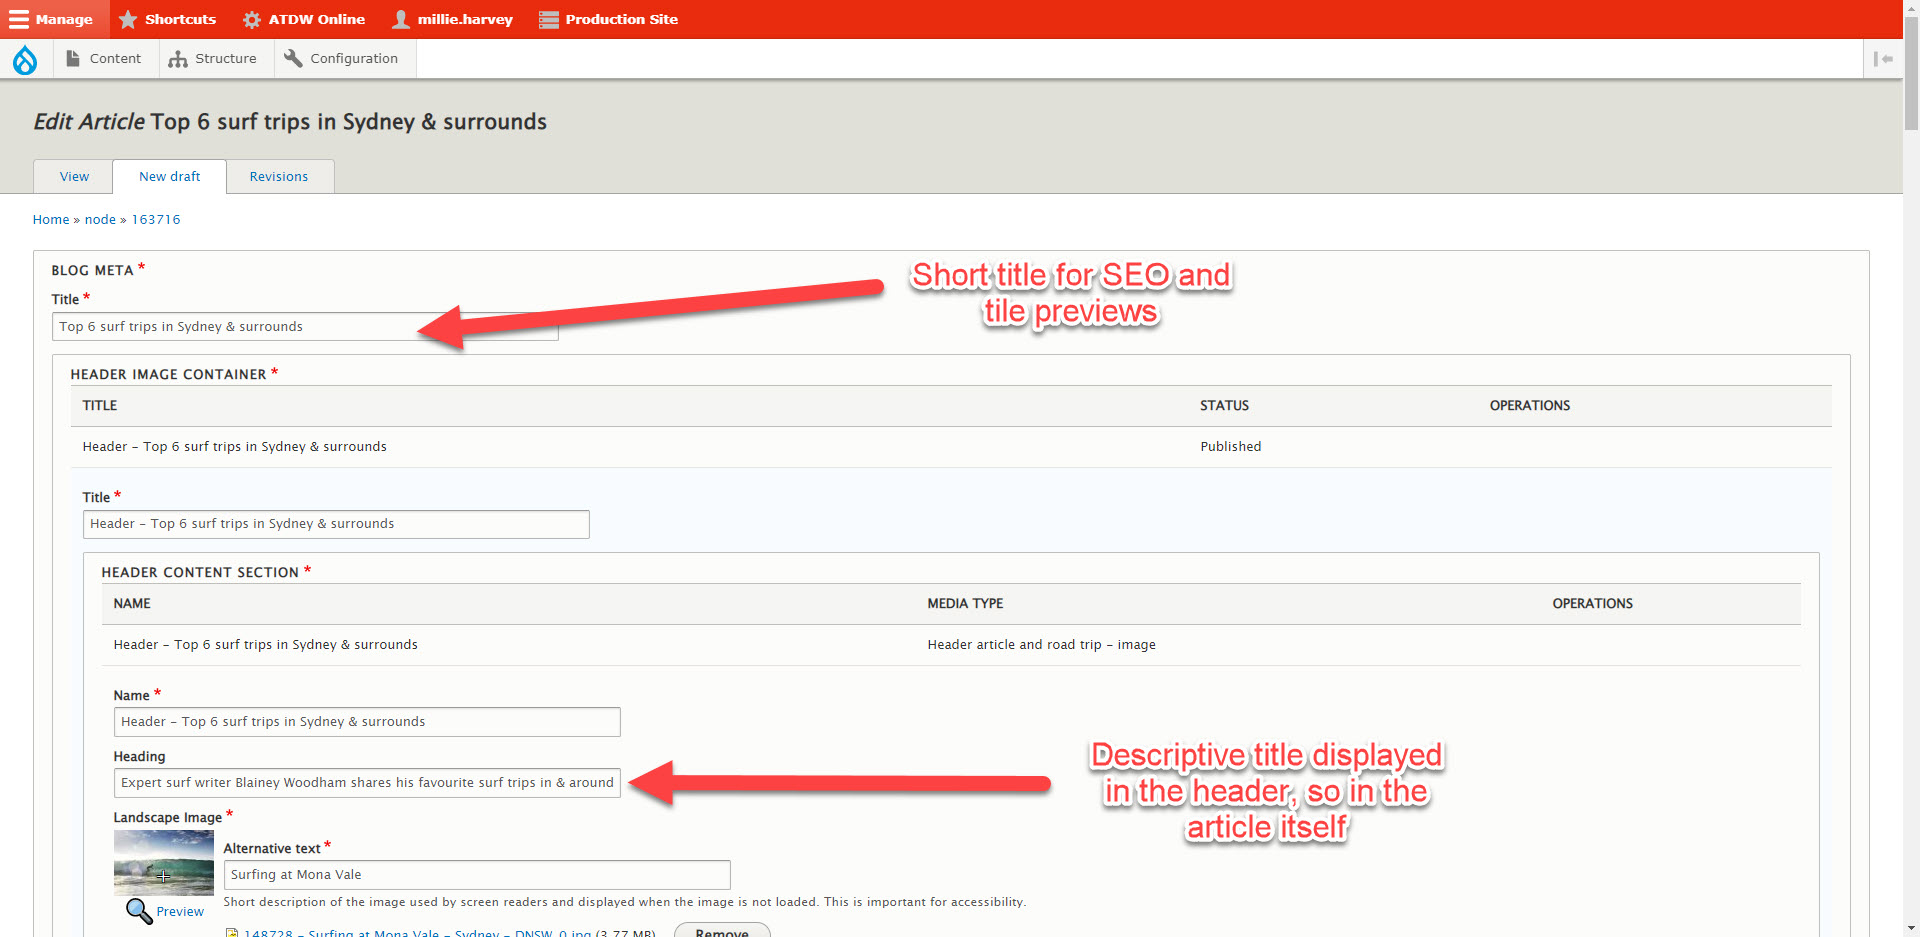
Article Titles
You should be provided a title that is for the backend and for the small tile preview to be displayed, and then also a title that lives in the header itself, which is longer and more descriptive.
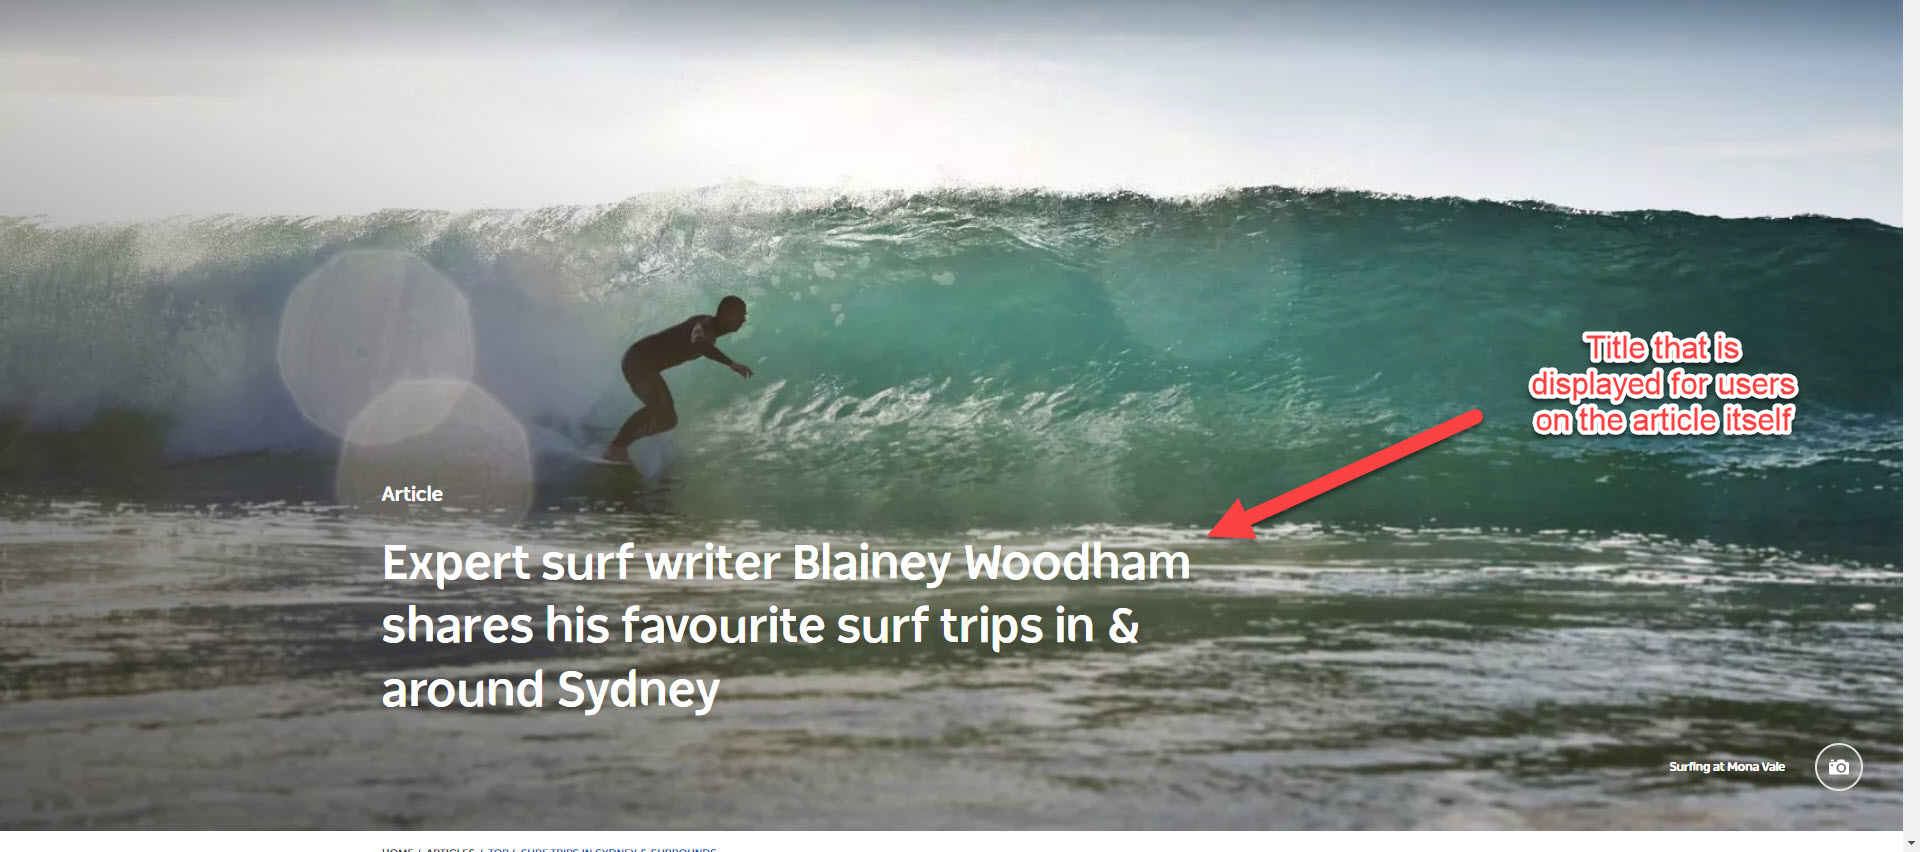
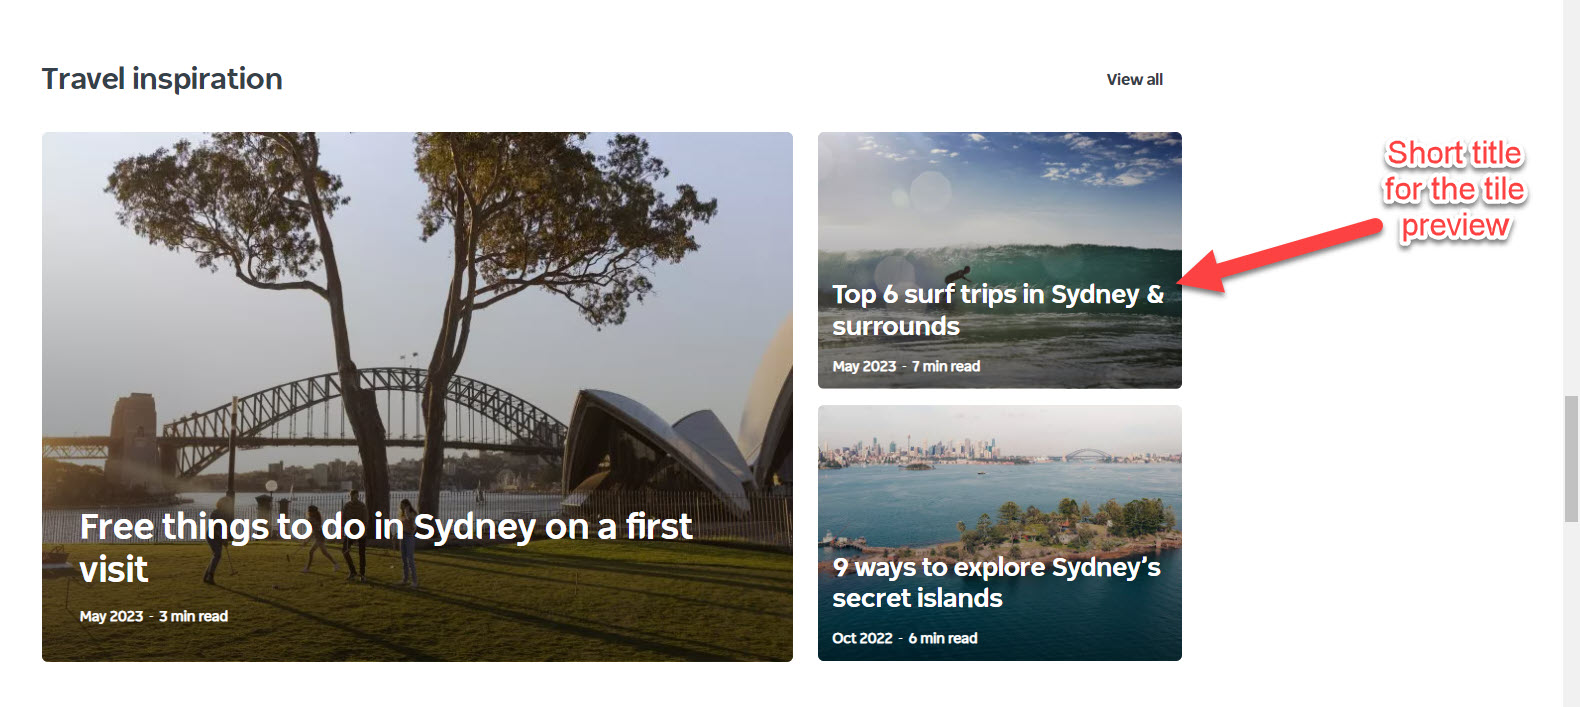
If you are not provided these, follow up with the person that briefed you, and ask for it.
If there's any confusion for building any of the above templates in the articles section, you can open up any of these existing articles, and follow along the same fields and settings.
ATDW Product/Product Profile Page
ATDW Product/Product Profile Page
Sydney.com & Visitnsw.com pulls through the following ATDW categories as Product List/Product Profile pages:
- Accommodation
- Attraction
- Event
- Food & Drink
- Hire
- Journey
- Tour
These can all be identified by both the template and url. The url will always contain the category type. The page template has an image gallery and information text field, with contact details on the side:
https://www.sydney.com/destinations/sydney/sydney-north/mosman/attractions/taronga-zoo-sydney
ATDW Product List Page
ATDW Product List Page
- This is a page list of ATDW products.
- It will be for one specific category, e.g. Accommodation, and will be specific to a destination, e.g. Mudgee.
- They were created automatically by the CMS, and then over time some have been rebuilt to include some introduction copy and a header image at the top as the generated version didnt include those elements.
- They're mostly accessed from the default links on a page, however can be linked in a tile directly anywhere if requested and also rank incredibly well in search from google:
Product list URLs:
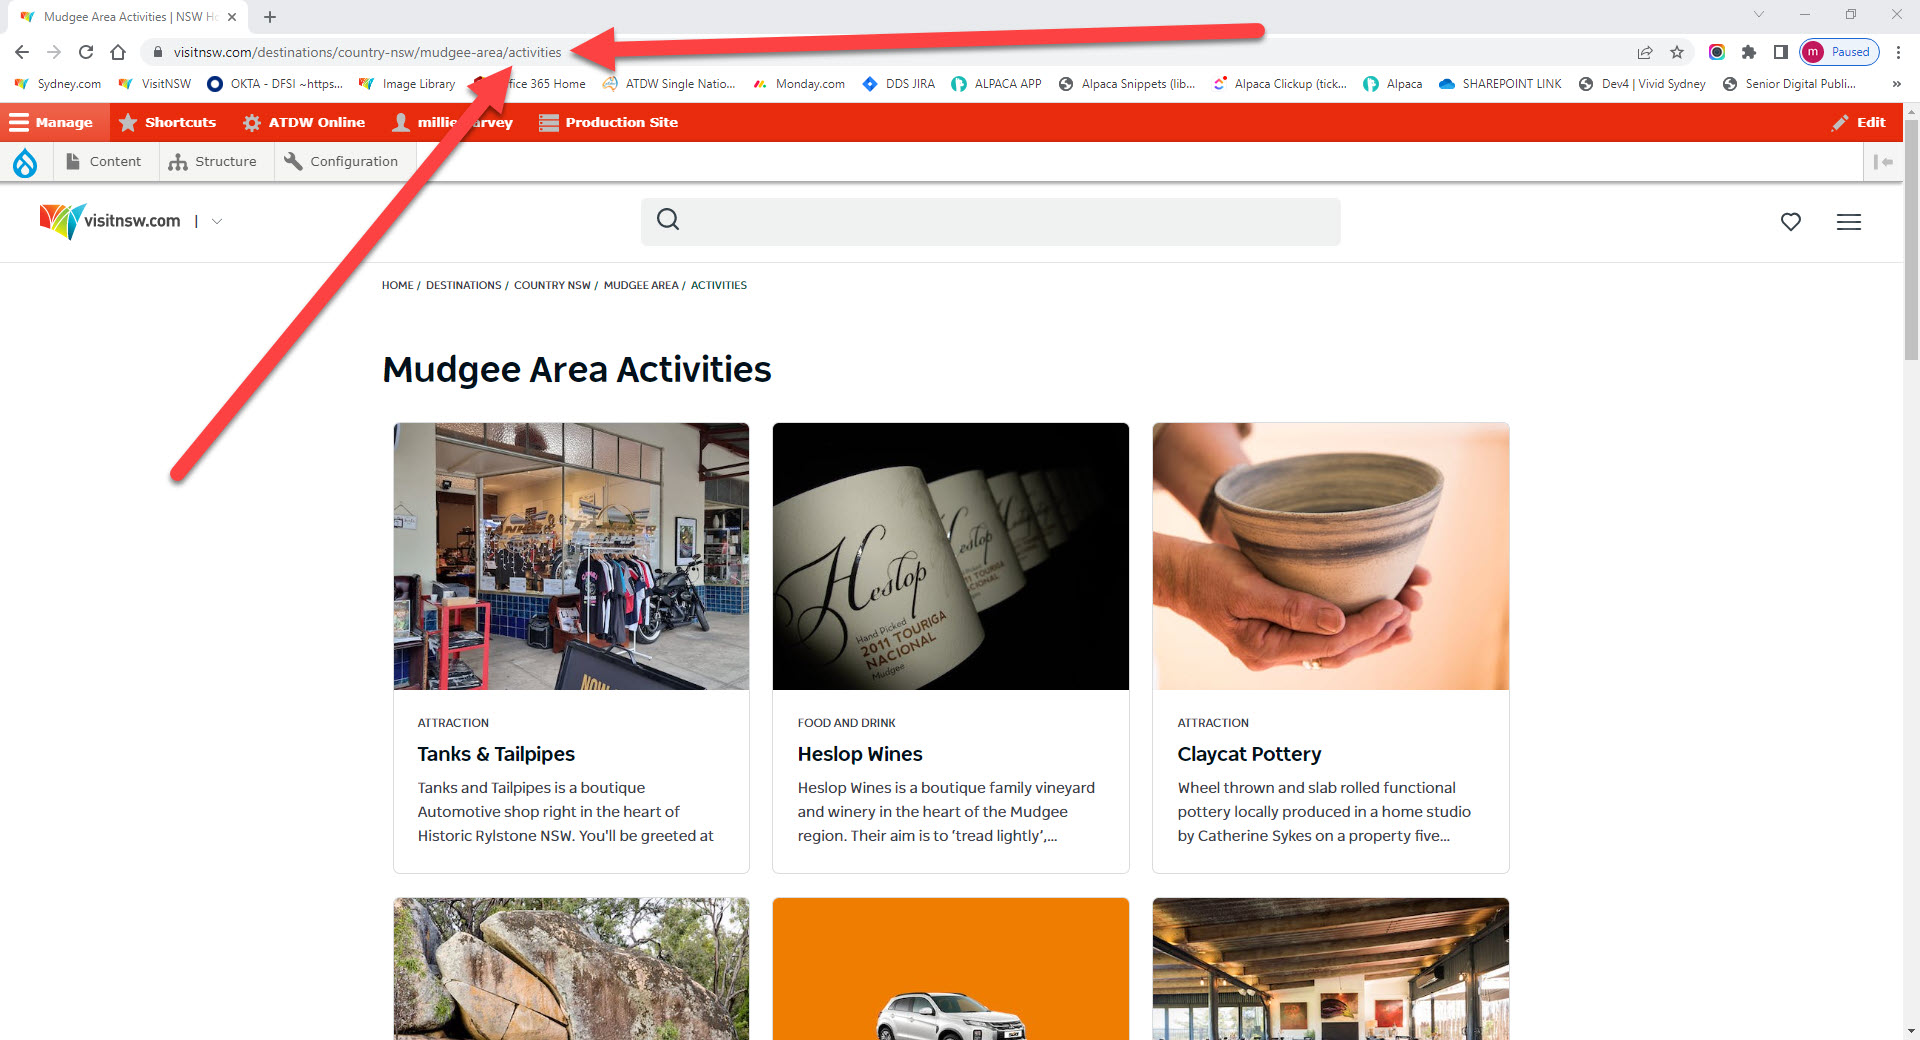
- The url should ONLY ever end in the specific category, e.g. /accommodation or /activities or /events - if you add in more than this you will break it.
- The title of the page does not need to be the url. A url is the abbreviated form of any title, and doesnt need repeated info (e.g. the destination).
- If you are briefed for the url to be different than just the category, explain why this can't happen to whoever has briefed you in, remembering the title displayed can be whatever they like.
When to edit an existing page rather than building one:
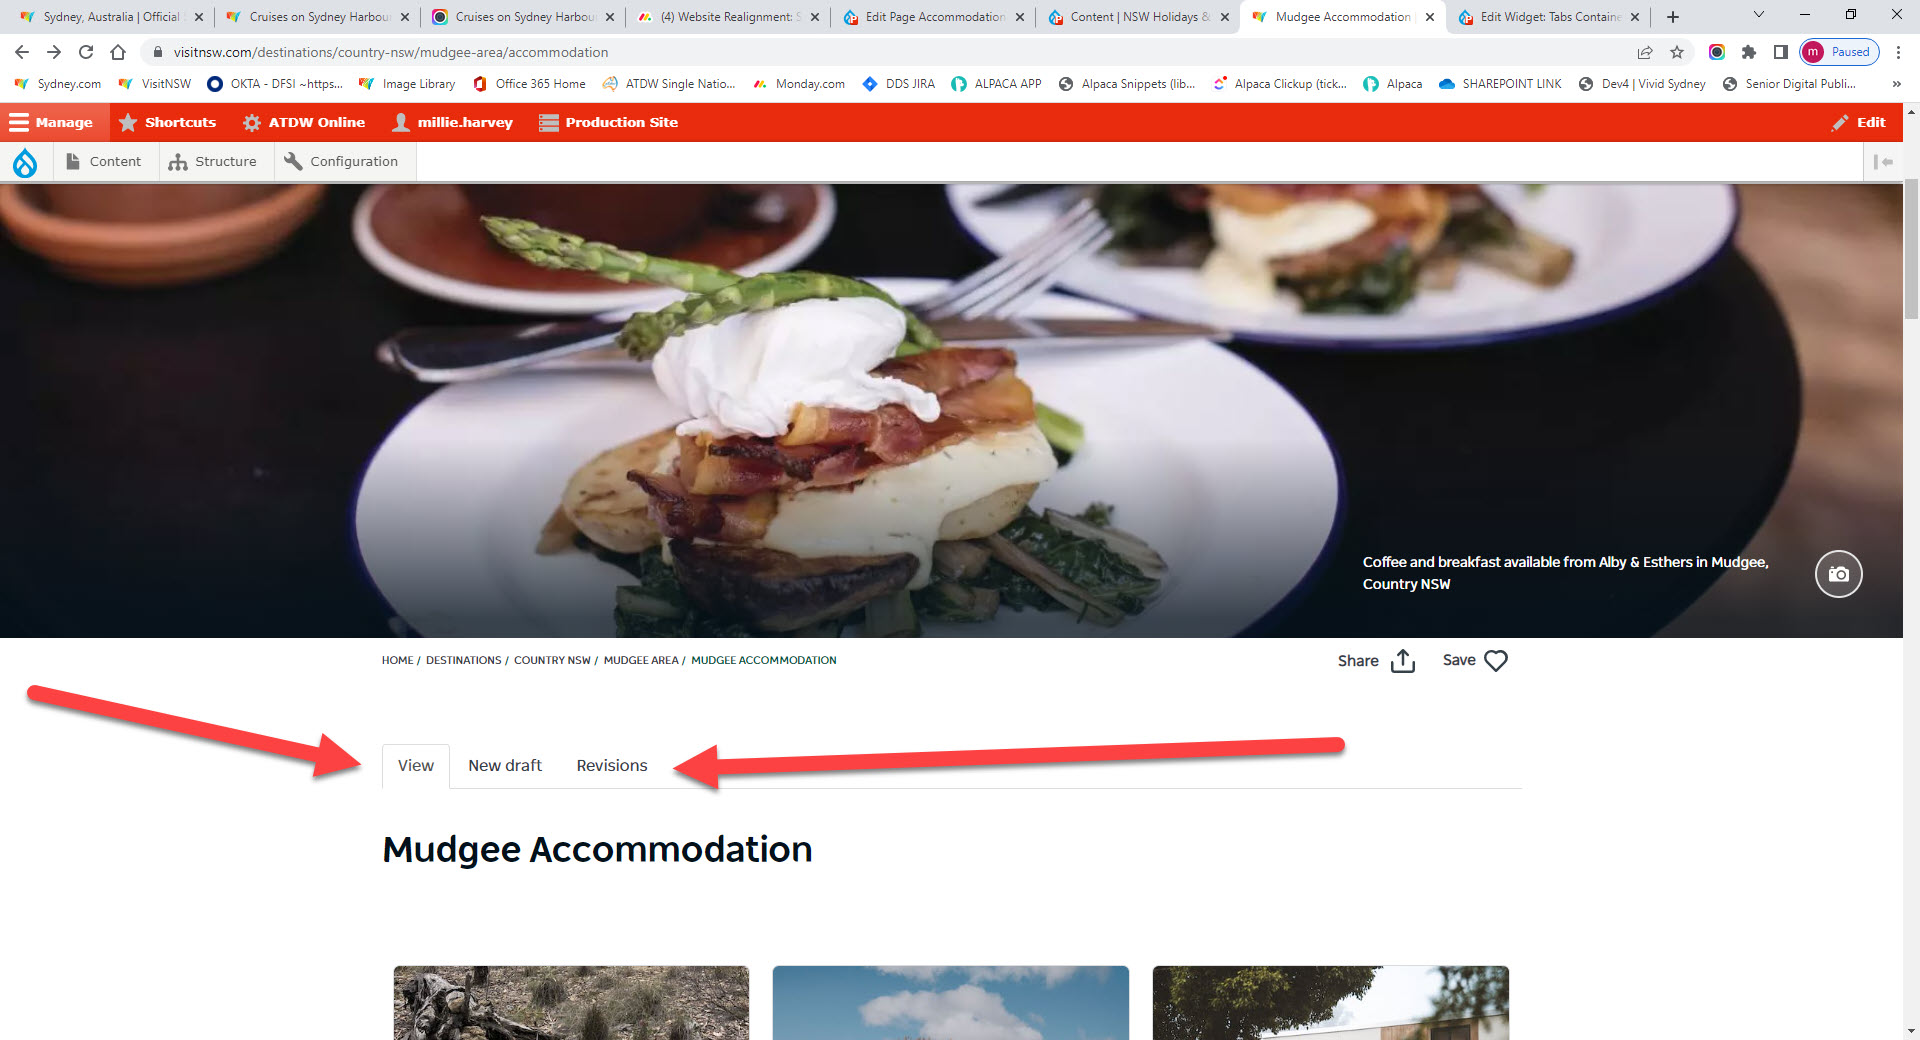
- If the page already has been rebuilt at some stage and you just need to edit it and optimise it, then just click 'New draft' and don't create a duplicate page:
When to build a new page vs editing one:
- If the page has not yet been rebuilt by us, it will be missing the editors tabs at the top of the page, and also won't have a header image, so it will look like this:
- So if the url takes you to a page that looks like this, you will need to build a page.
Building a product list page
- Content > Add content > Page
- Title* = The most basic relevant information, e.g. Mudgee Accommodation. Do not put the consumer facing title here.
- Widget Bottom: Widget: Product Lists "Add new node":
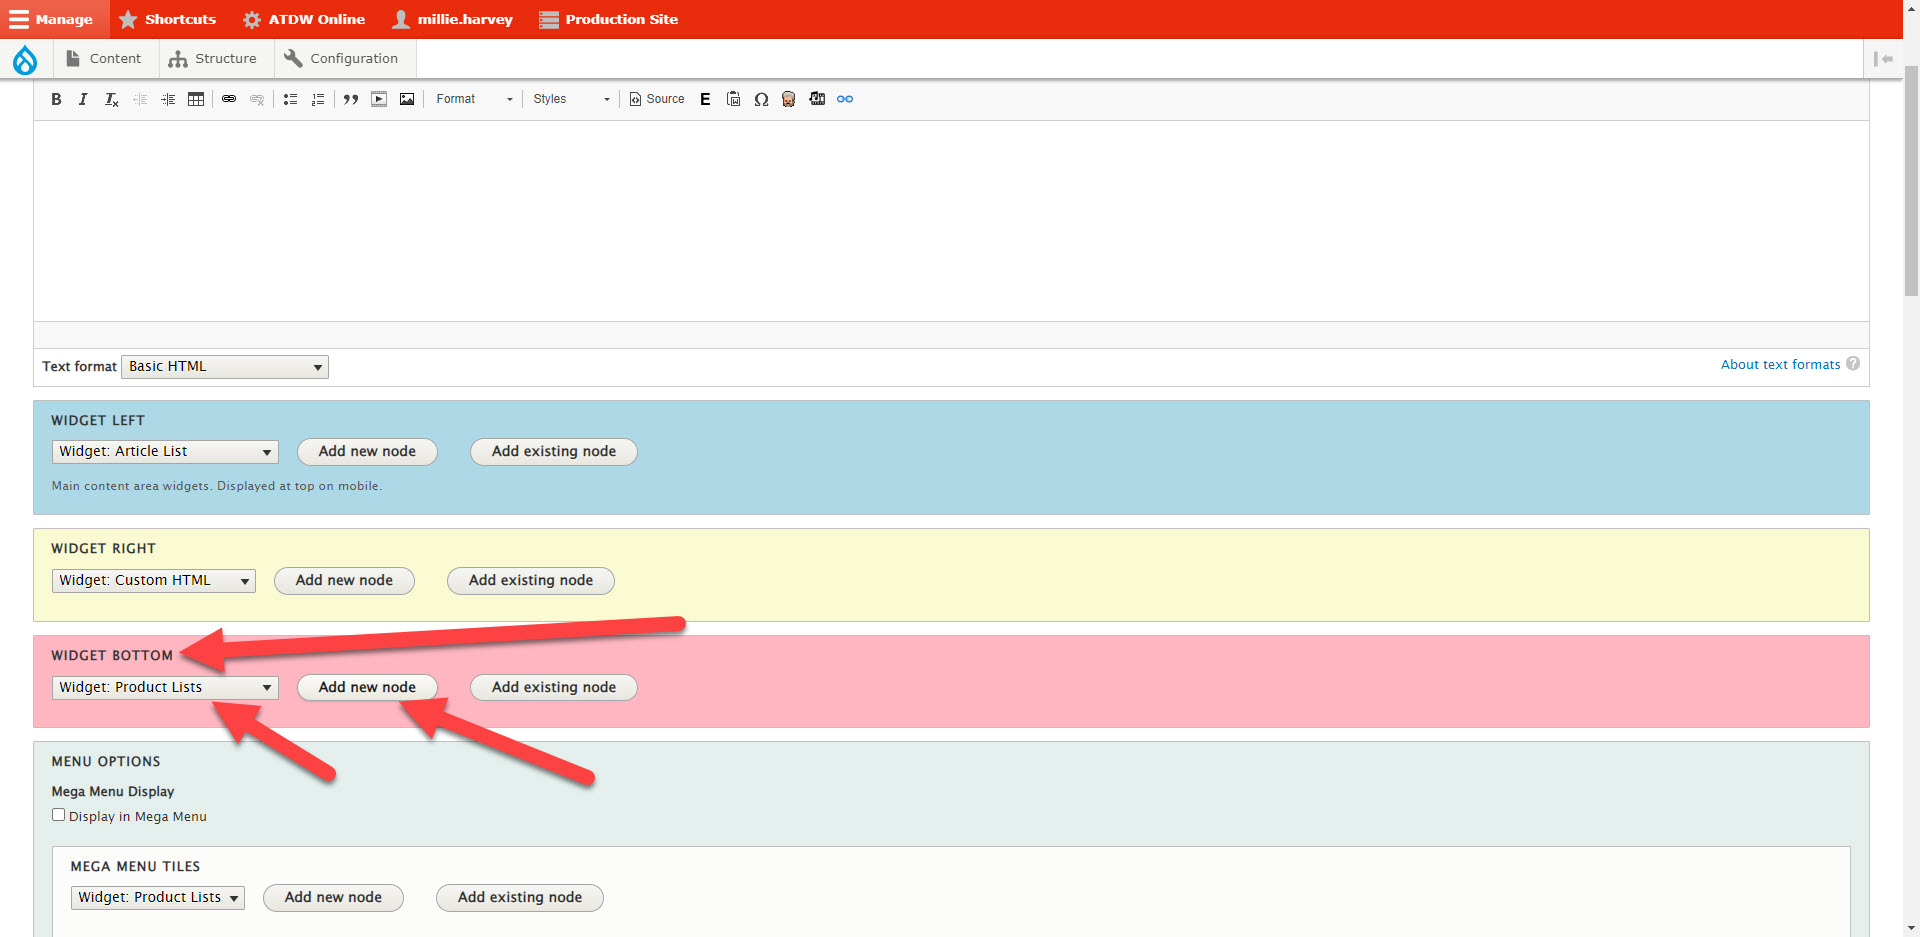
- Title* = Page name, e.g. Mudgee Accommodation - Product List
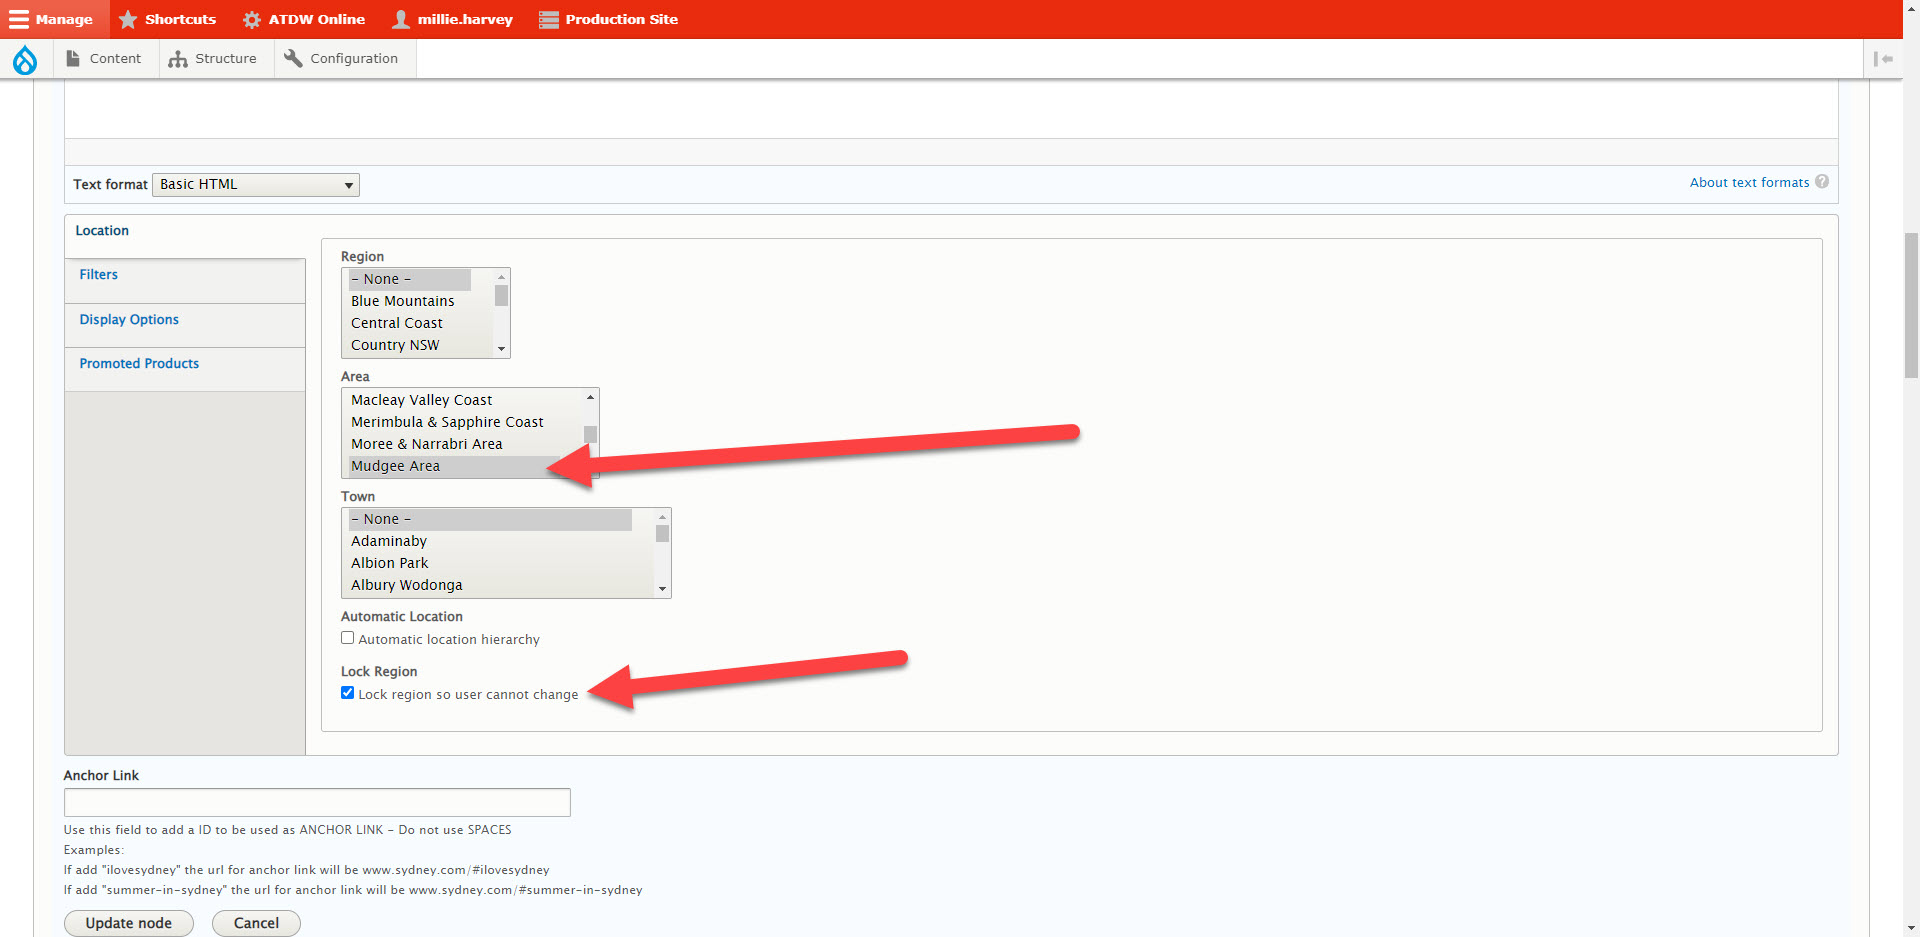
- Select the correct criteria - e.g. the location you're building it for. Select to lock region
- Display options tab
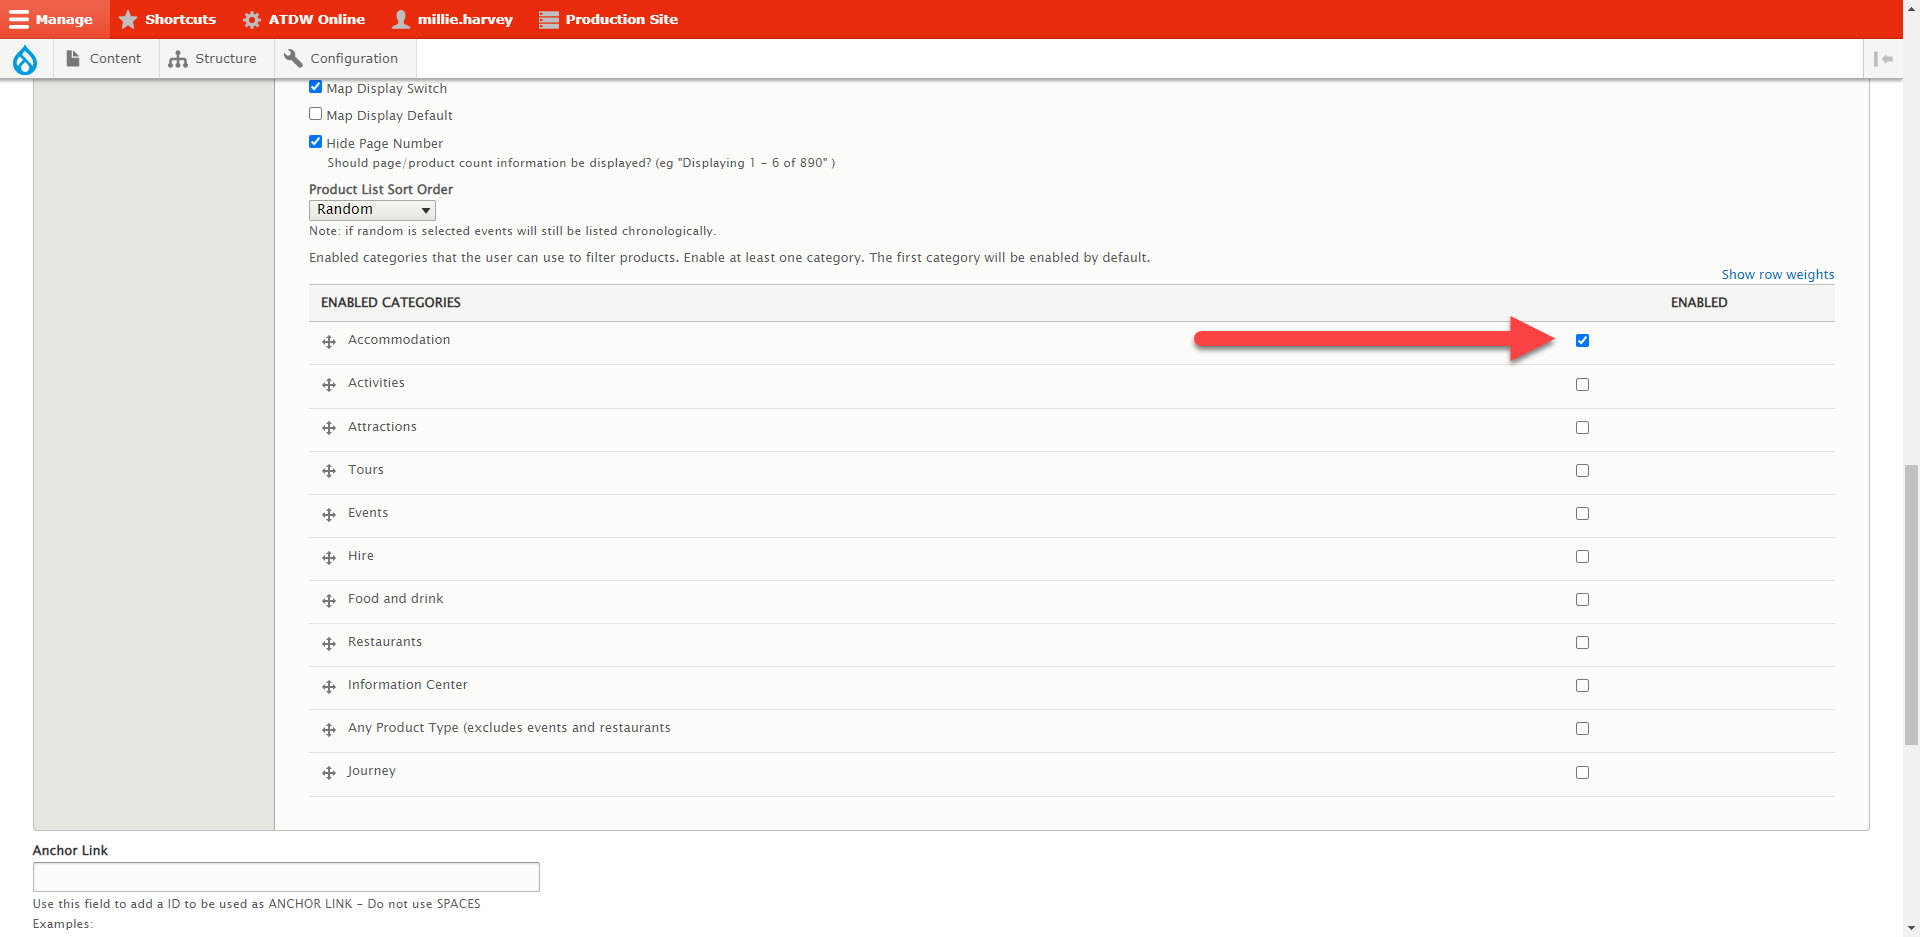
> Product List View Mode: "Product List Domestic". Note: It used to be paged, however on paged you cannot display the filter, so have changed to domestic.
> Tick yes for: "Show product search form" + "Map Display Switch" + any other relevant filters you need to display
> Enabled categories: this should be the category you're building the page for, and drag it to the top of the product list:
- Create node
Page Meta - Header Image Container
- Build a header container like you would for any other page: Header - Mudgee Accommodation
- If one exists already, remove it and build a new one
- This is where you will put in the display name for the page, so it will be longer and most likely more descriptive, e.g. "Accommodation in Mudgee & surrounds"
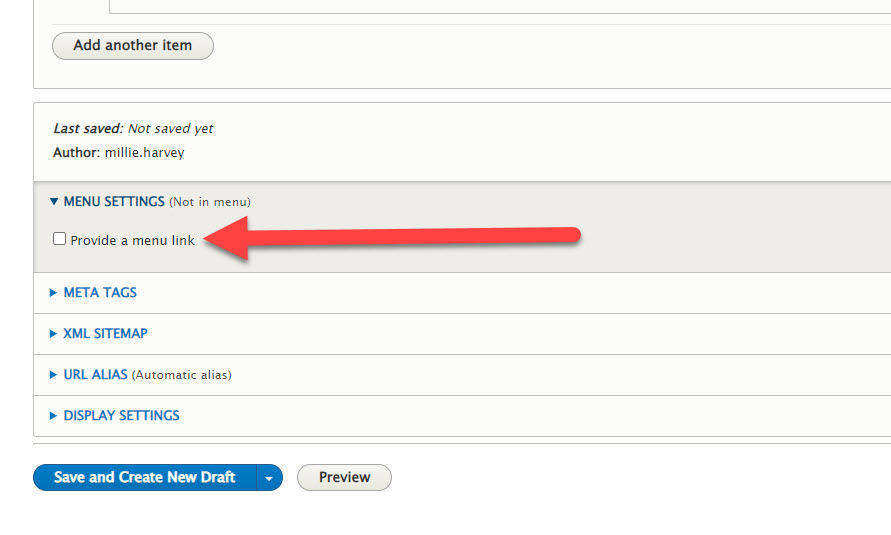
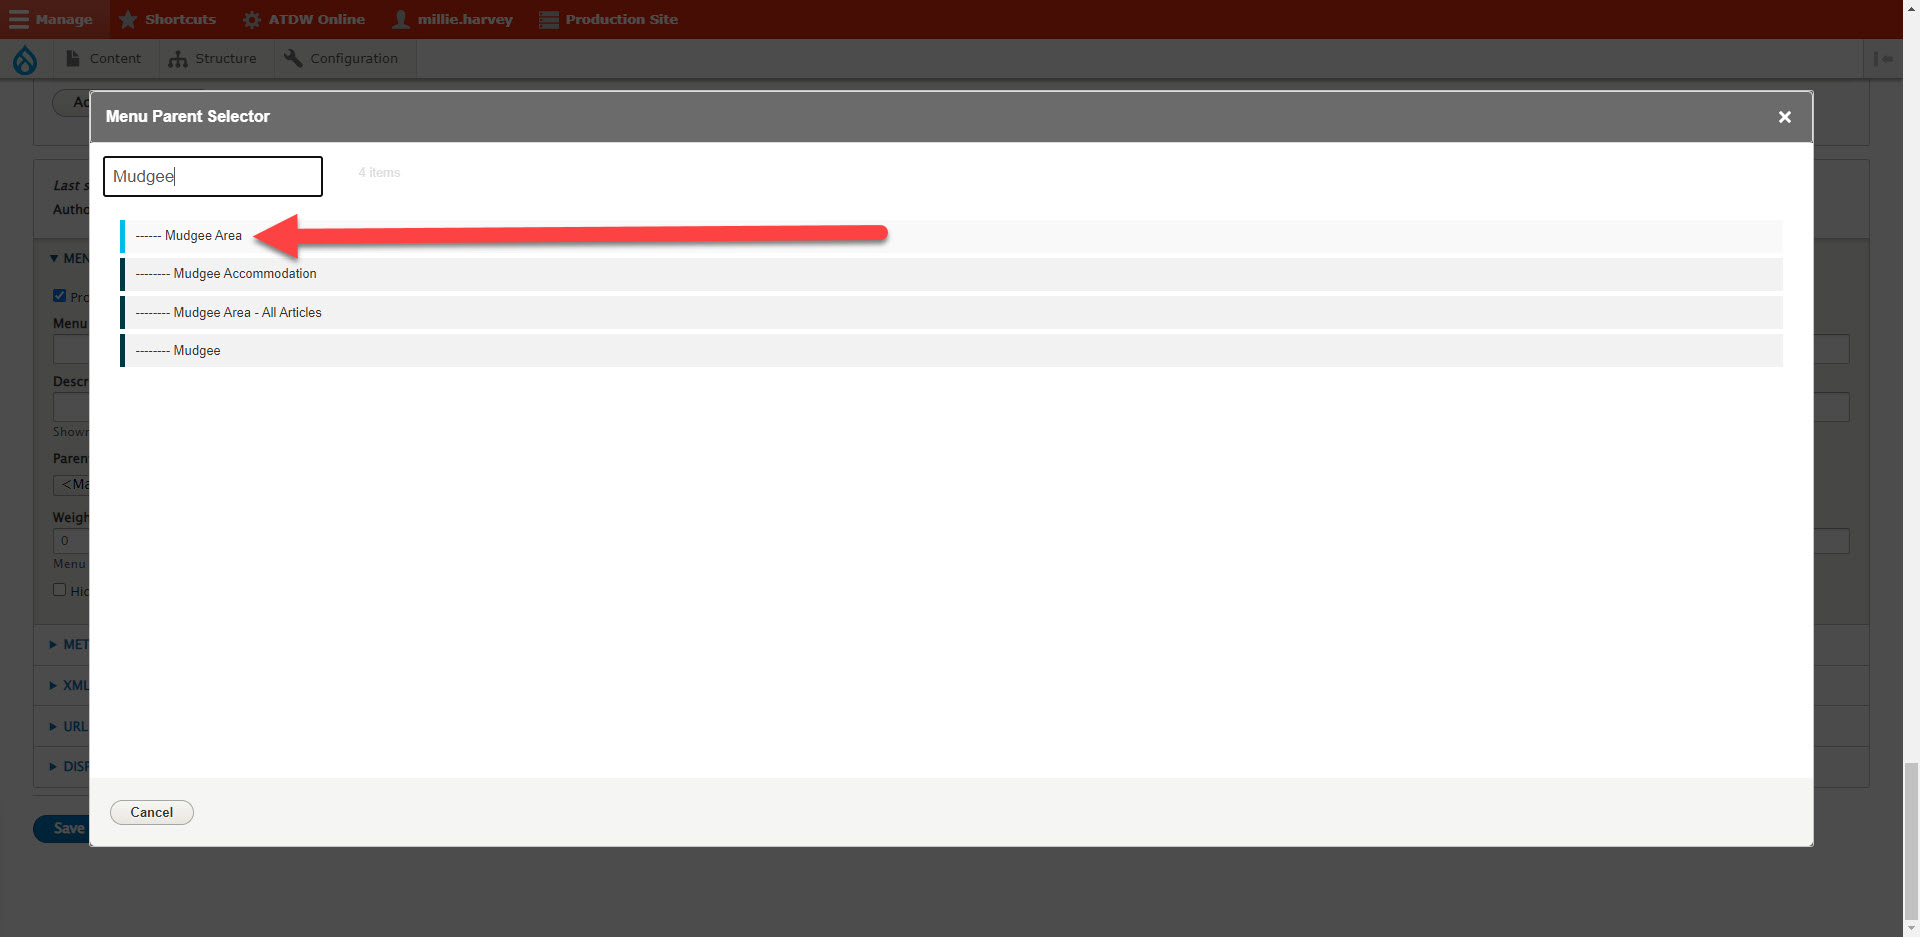
Menu Settings
- Tick "Provide a menu link"
- Click on the '+' button that appears in Parent link:
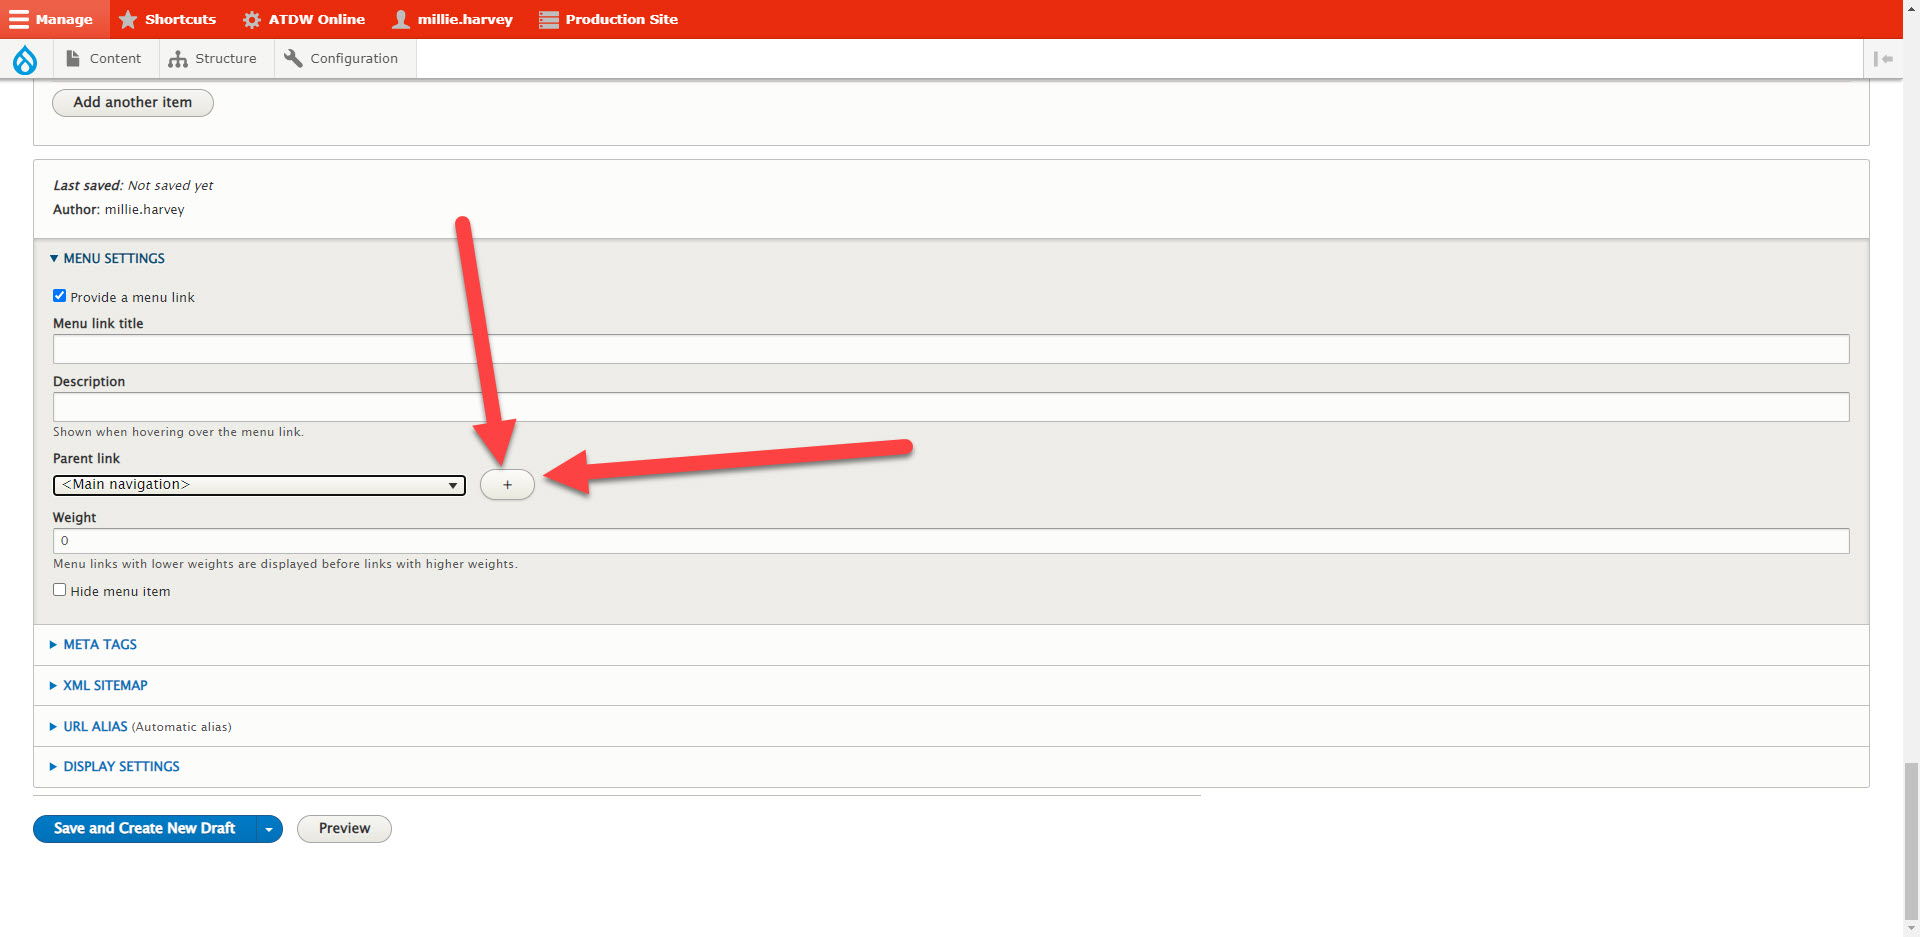
- Type in the destination for where this page is being mapped to in the hierarchy and click which one you want it to sit under
- Enter the meta data
- Save and publish
- Don't forget to publish the header container separately
Editorial Navigation Page
Editorial Navigation Page
Used for high level pages, the page is mostly tiles containers, with minimal content
Purpose is to help users find their specific content quicker
- Mega menu pages
- Things to do pillar theme e.g Food & Drink
- Region level pages
- Area level pages
Editorial Content
Editorial Content
Editorial content pages are pages that aren't articles, but still have the purpose of being informative text, and generally have minimal tiles containers but rather product lists on them:
- Destination town pages
- Theme pages requiring content
E.g. Mosman: https://www.sydney.com/destinations/sydney/sydney-north/mosman
E.g. Outdoor dining in Sydney: https://www.sydney.com/things-to-do/food-and-drink/food/sydney-restaurants/outdoor-dining
Road Trip
Road Trip
Road trips are their own section of the website, and in terms of page creation, they are shell pages, which we pull through code from the ATDW platform. The road trip content itself is accessed via the Alpaca platform.
Road trip example: Cool Coast to Intrepid Inland
All instructions on how to build this page and the widgets required can be found here:
*Miscellaneous
*Miscellaneous
- Really only ever for pages like this Digital Publisher Guide. It's in the backend as a page type classification so reporting isn't affected by staff having pages like this.
Copy/Content Style Guide & Rules
"And" vs "&"
"And" vs "&"
In headings: always use "&".
Body copy: always use "and", unless it is part of the company/business name.
Article Image Captions
Article Image Captions
Name of the business/activity + Location + Always include an image credit if not DNSW.
Formatting is - Credit: *the photographer*, *if there's also an organisation*
E.g. Sydney's Open For Lunch - YCK Laneways - Credit: Cassandra Hannagan
E.g. Park Hyatt Sydney - Credit: David Mitchener, City of Sydney
Meta Data
Meta Data
Copywriter will always provide both title & description
The name is always the page title, followed by this: | - and then put in either Sydney.com or Visitnsw.com
E.g. Best Dog Beaches in Sydney | Sydney.com
Numbers
Numbers
- Always use the number symbol for tiles
E.g. 8 budget-friendly school holiday activities
Structure & Configuration
Redirects
Redirects
Location: Configuration > Search & Metadata > URL redirects
- + Add redirect
- Path* = node/page id found in url. E.g. the Events page: https://www.sydney.com/events, has the node id of 8126
so e.g. https://www.sydney.com/node/8126
- To* = website url /node/ new page's id.
eo e.g. https://www.sydney.com/node/1234
Note: it is essential you copy the exact node number. If you use the wrong one, you will redirect something else, and you won't be notified of the incorrect number.
URL's & Mapping
URL's & Mapping
- Articles are automatically mapped. You won't need to do this
New page creation:
- Menu settings > tick "provide a menu link"
- In "parent link" > "+" > select the parent page for where the new page should be mapped to
URLs:
- Page meta* > "slug" field - no spaces, only hyphens, be as specific as possible to the page
For example, the Spas & Wellbeing page. The "parent page" is "Fashion and Shopping", the slug is simply "spas-and-wellbeing", creating this url:
https://www.sydney.com/things-to-do/fashion-and-shopping/spas-and-wellbeing
Sync an ATDW Product in the CMS
Sync an ATDW Product in the CMS
1. In the red bar at the top, click on "ATDW Online"
2. Select "Product Sync" from the new menu that appears directly below it
3. Paste in the product ID number into the field - note, it's the URL number in the ATDW profile (the same one you use for the Hodor copy linking):

Articles
Standard Article Example
Standard Article Example
Listicle Example
Listicle Example
Itinerary Example
Itinerary Example
Teaser Tiles
Teaser Tiles
Teaser tiles are what are pulled through onto editorial pages:
- Teaser image = vertical/portrait image
- Teaser image horizontal = of course horizontal/landscape (what is shown above in the screenshot)
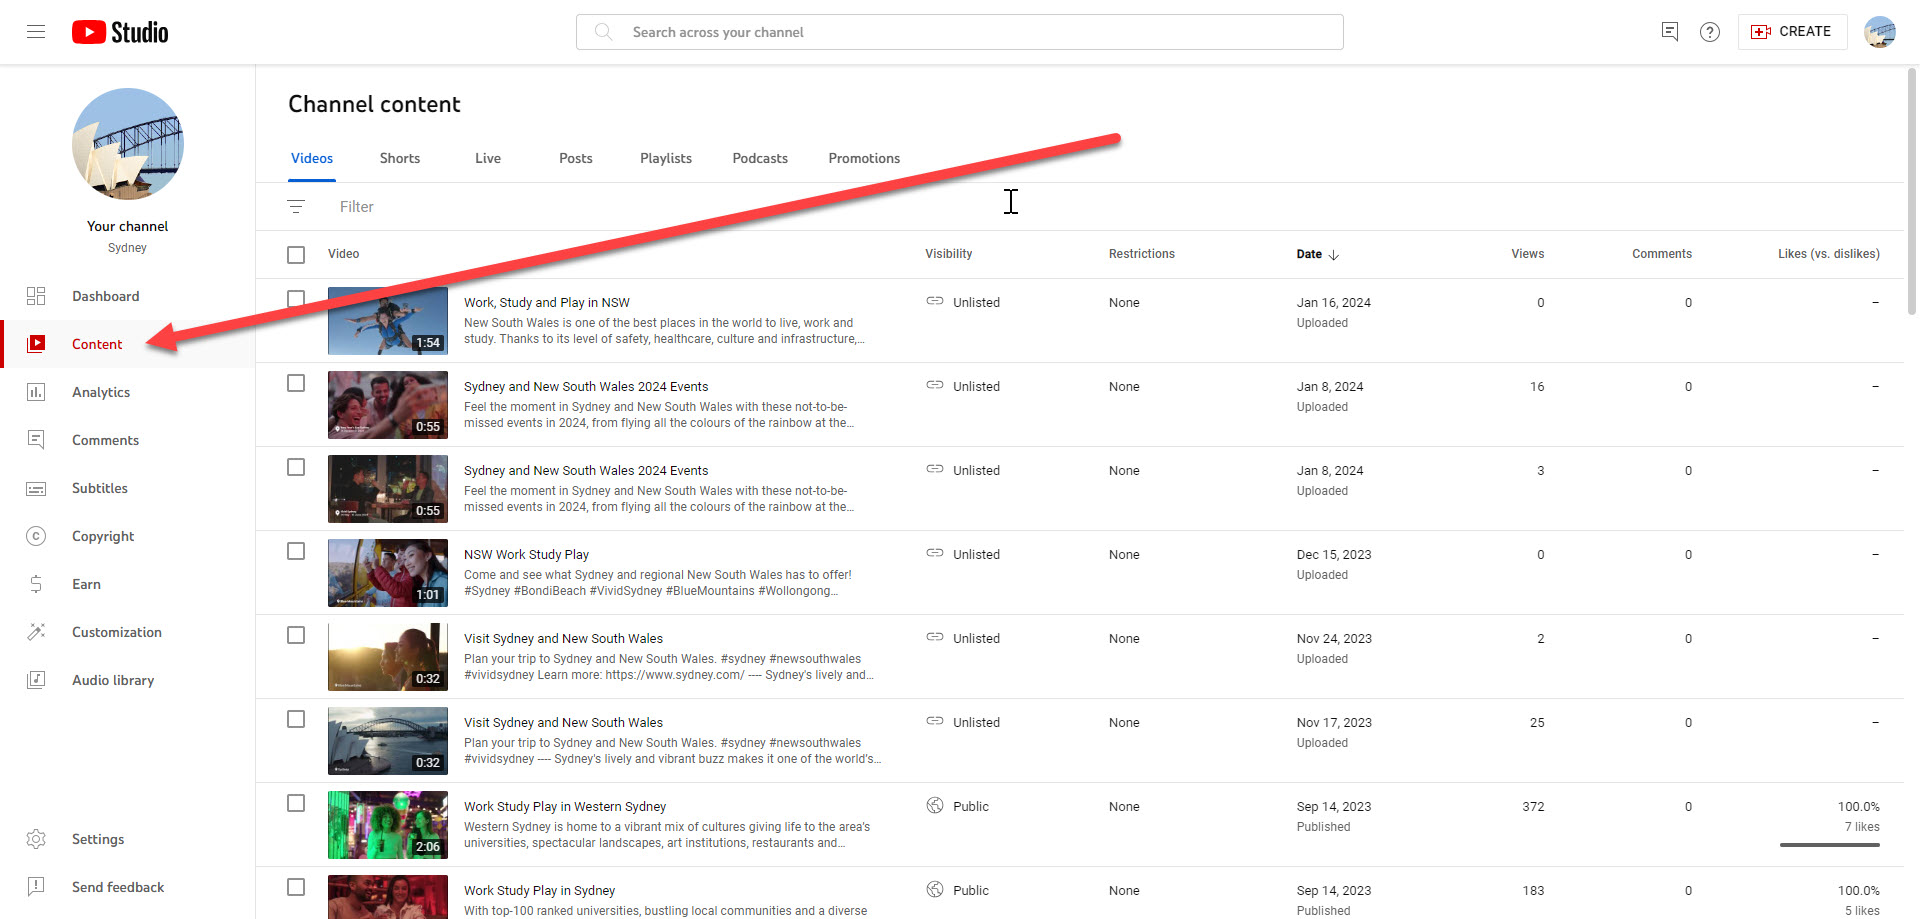
Youtube
Logging into Youtube
Logging into Youtube
There are two separate Youtube accounts.
If you have never uploaded a video before, you'll most likely need to add the profile account to your computer, which it will then keep open as a profile and you can switch between users afterwards.
So log into the relevant Google Account "profile" first, as Youtube sits within a google profile - either Sydney or Visitnsw. I have a screenshot below of where to click for this, you only need to do the "adding" once as mentioned above.
Sydney: Sydney account: @sydney
Profile: https://www.youtube.com/user/seesydney
Email: dnswsyd@gmail.com
VisitNSW: VisitNSW account @visitnsw
Profile: https://www.youtube.com/user/visitnsw
Email: visitnsw@gmail.com
Uploading a video
Uploading a video
Once you have logged in, you can go to Youtube. If you haven't logged in yet at this step please go back to the Logging Into Youtube section above and use the information provided. Any issues come and ask Millie.
Channel URLs:
Checklist
Before uploading anything, check the brief and make sure you have all the information you need. A checklist I've created:
- The video file itself
- Which channel they would like the video to be uploaded onto (sometimes an international ad will include NSW content but is still uploaded to Sydney)
- The level of publishing they want for the video. Either Public or Unlisted
Public = Published to the channel to live as content viewable intended for general consumers
Unlisted = Viewable by anyone with the url to the video specifically, but not published to the channel. This would be mostly for Advertisements, as you can embed/link the video anywhere, but it's not part of a "playlist" to be displayed. - The video title to have displayed to consumers (this is publicly visible)
- The video description to have displayed to consumers (this is publicly visible)
- A url to include for the viewer to have a CTA available/action to learn more
- Any #'s they would like included at the end of the description to help with SEO
- If the video should be added to an existing playlist
Ready to upload
Make sure you have downloaded the file from the link provided to you in the brief.
If there are multiple videos per brief, it's strongly advised to do one download at a time, then delete it from your own files once complete and then do the next, to avoid any mistakes of uploading the wrong video, or the same video multiple times.
Note: you can change copy/title fields once a video is uploaded, but if there is an issue with the video file itself, you will have to start again and will get provided a whole new url. You cannot use a placeholder video, the platform won't allow it. For edits, see the tab below in this FAQ.
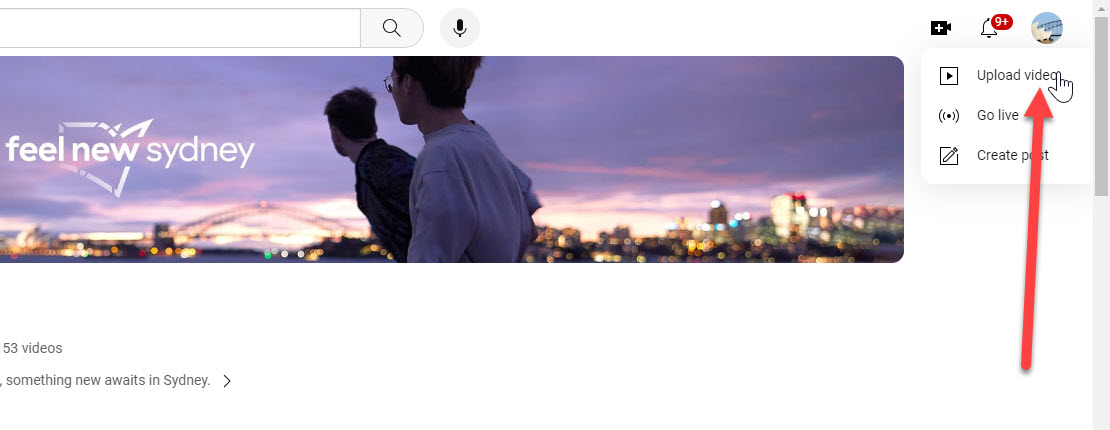
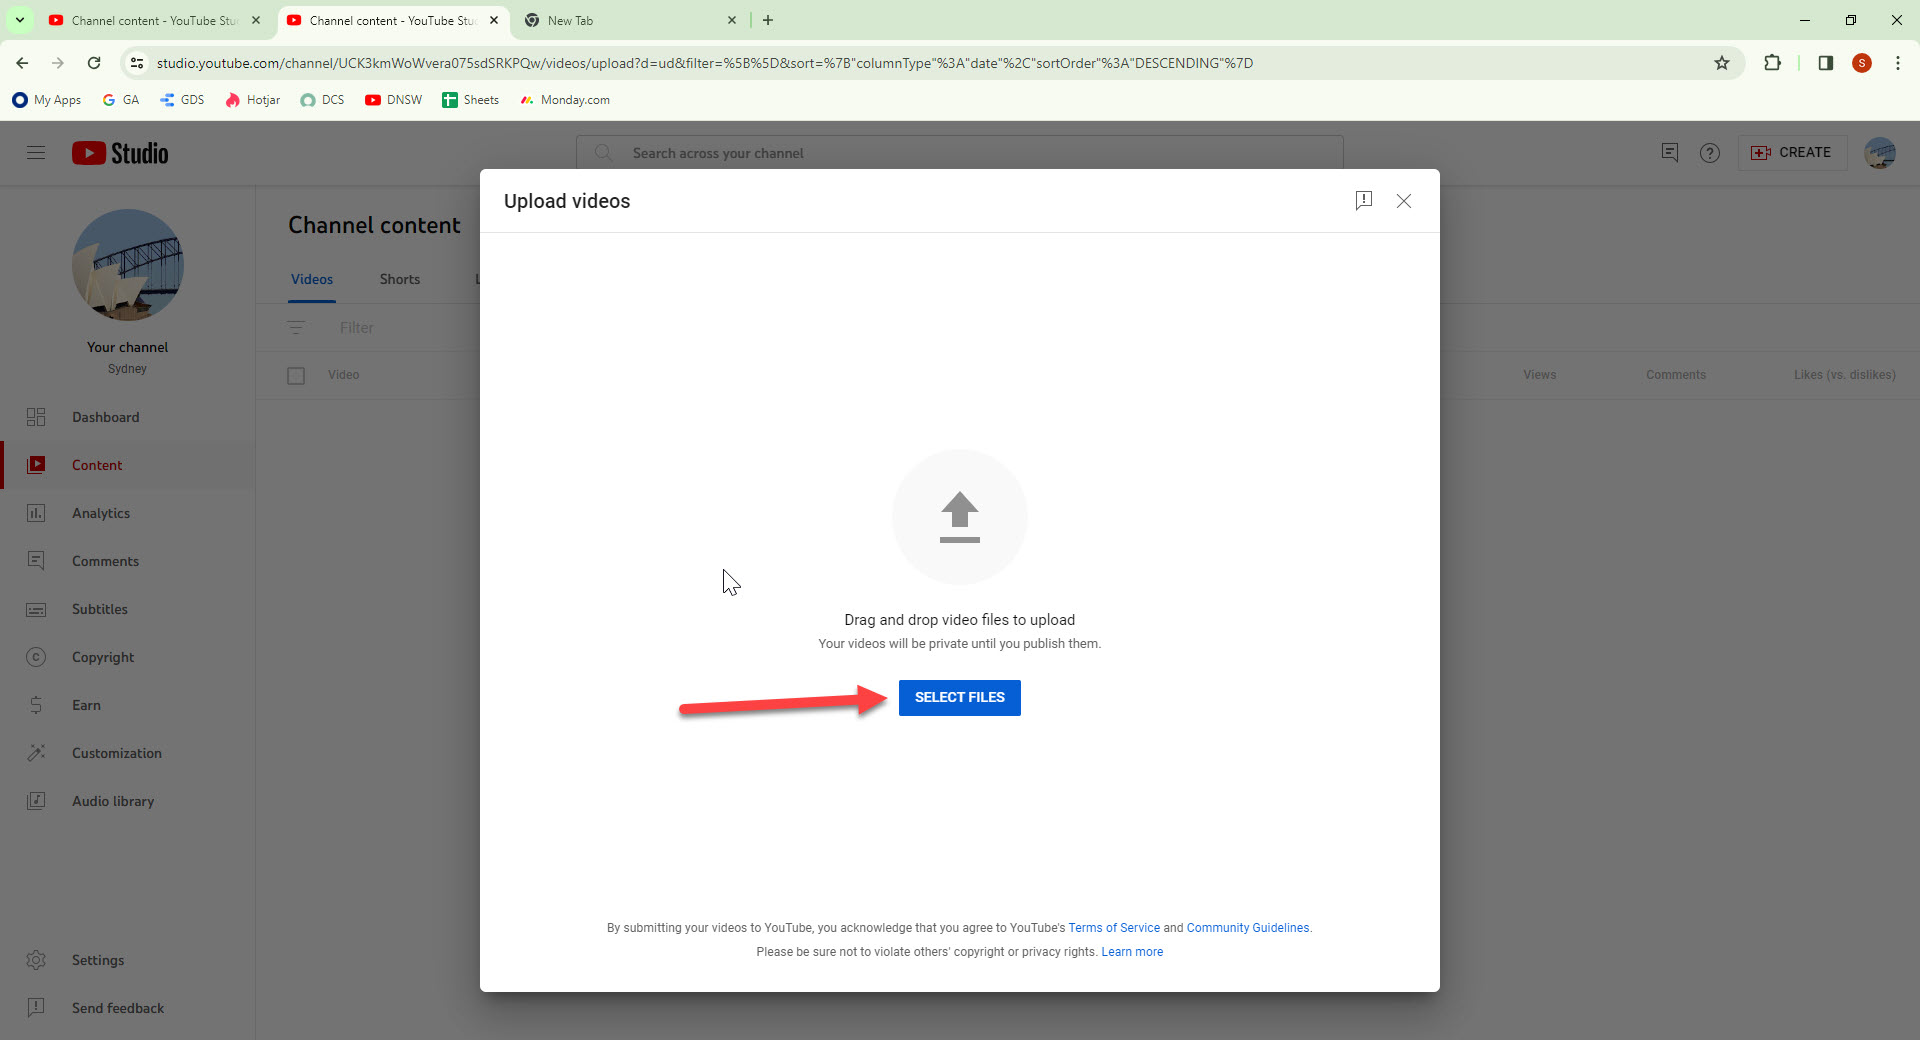
Now that you've downloaded your video, click the film camera with a plus sign top right of the channel screen, and select "Upload Video":
Upload file:
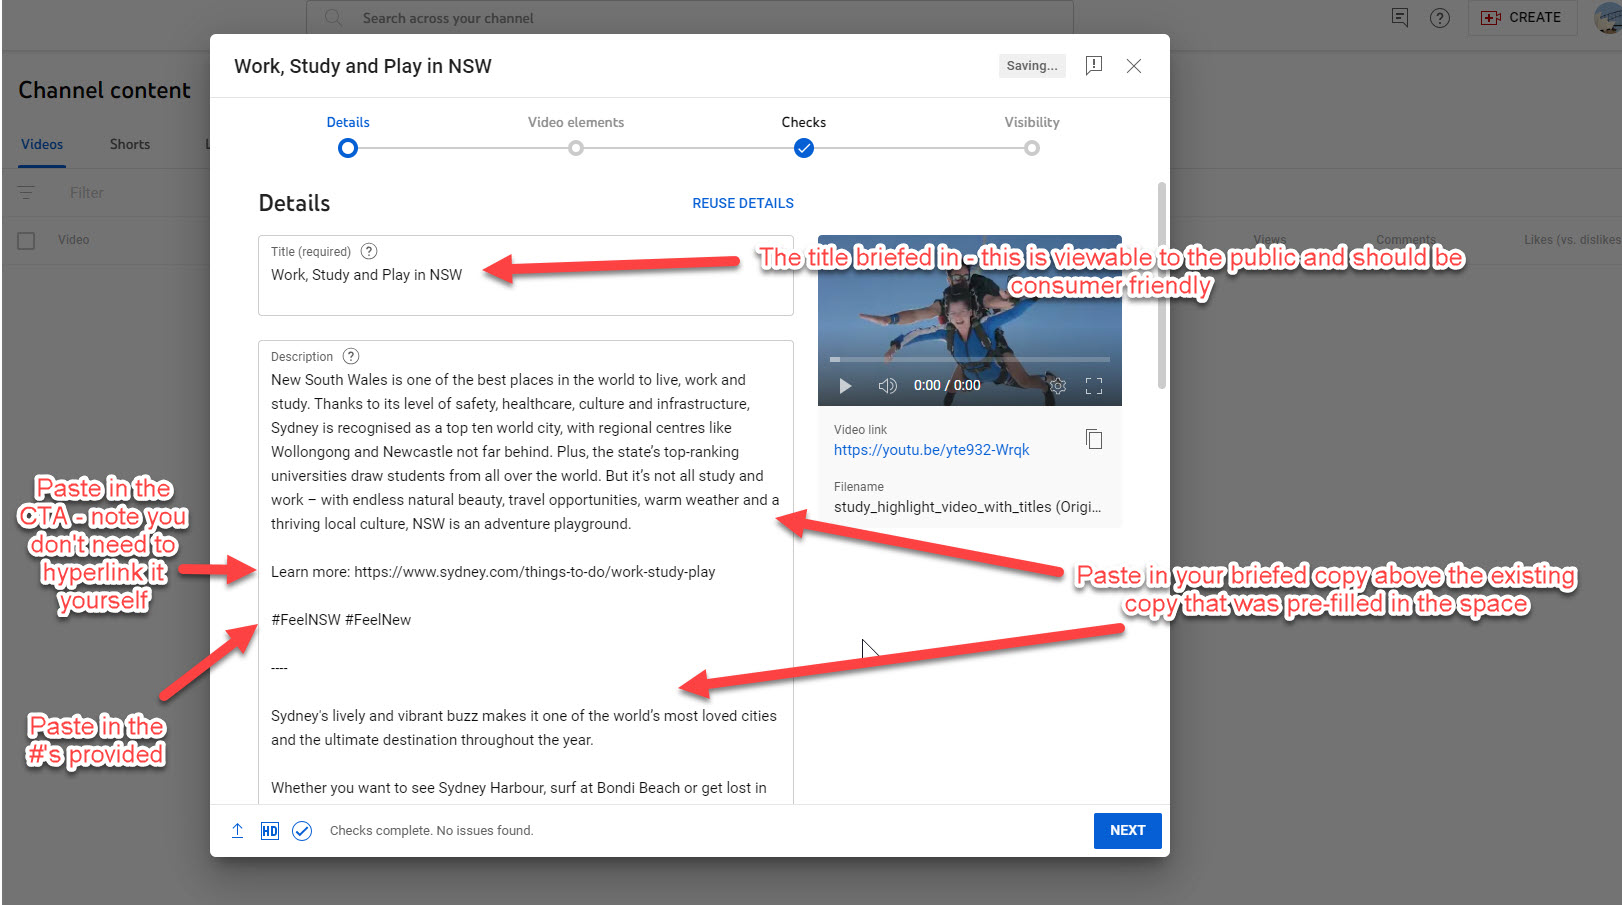
Title & Description Fields - the "Details" screen
Fill in the details of the "Title" and the "Description". The title field will need to be replaced as it auto-populates the video file name. Insert the description above the prefilled content.
When filling in the description, please don't backspace what has been prefilled, rather just enter it down and paste in the copy briefed in so it sits above it. The copy underneath the line indication is prefilled to help all videos with SEO. You should never need to touch this copy.
After you've pasted in the description, paste in the CTA, which you do not need to hyperlink. Youtube hyperlinks it for you, just make sure the whole url is pasted in, inc https://
After you've pasted in the CTA, include the hashtags that were provided in the brief. You don't need to do anything extra here either.
Once this is done, scroll down on the page, before you hit next to select the thumbnail (next point for instructions).
Thumbnail & Playlists
Once you've scrolled down underneath the Title & Description, you'll be provided with 3 image options as a "thumbnail" - this is what the viewer see's as the little window preview when the video is linked somewhere.
Currently we do not have a dedicated Youtube staff member to be producing individual thumbnails, so in lieu of this role, select/click the preview window that looks the best from the options generated.
You can then also select from the drop-down which Playlist this video should be part of, if one has been identified in the brief.
This section may take some time to load, that is okay, the platform is just processing the footage so sometimes needs some patience.
Once these are done, click "next"
Video Elements & Checks
You will then be shown a screen titled "Video Elements" - when there is a dedicated Youtube staff member they can do lots of fun elements and variations to a video that pop-up, but they take time to build, so in lieu of this staff member you can click 'next' (unless specified for a special Brand Video etc).
You'll then be shown a "Checks" page, where it will let you know there's no copyright infringements, so you can again click 'next'.
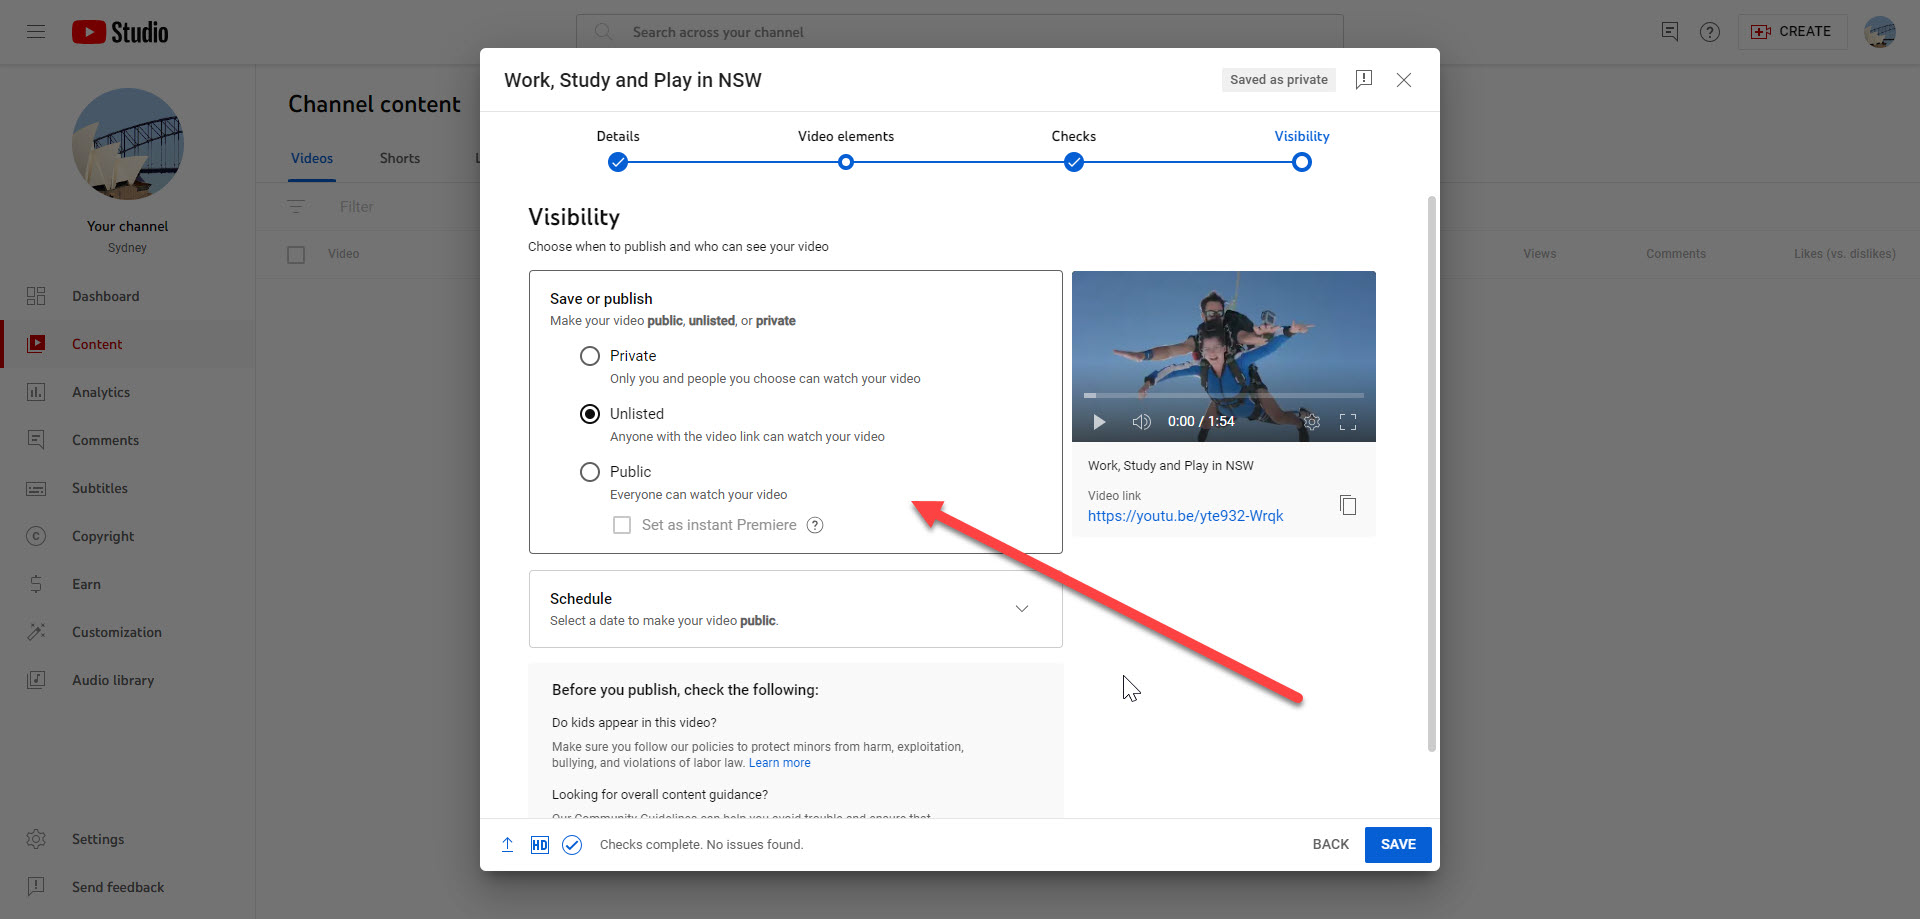
Visibility
This is an important slide, it's where you choose the publishing level for the video.
It will default to "Unlisted" - this is okay for most ads (except big brand ones) - just choose which level was entered in the brief. There are extra prompts here to help for clarifying the levels, and as mentioned earlier my explanations are:
Public = Published to the channel as a "post" and as content viewable intended for general consumers/everyone. E.g. A feature video on Tamworth.
Unlisted = Viewable by anyone with the url to the video specifically, but not published to the channel. This would be mostly for Advertisements, as you can embed/link the video anywhere, but it's not part of a "playlist" to be displayed. E.g. Singapore 30second ad.
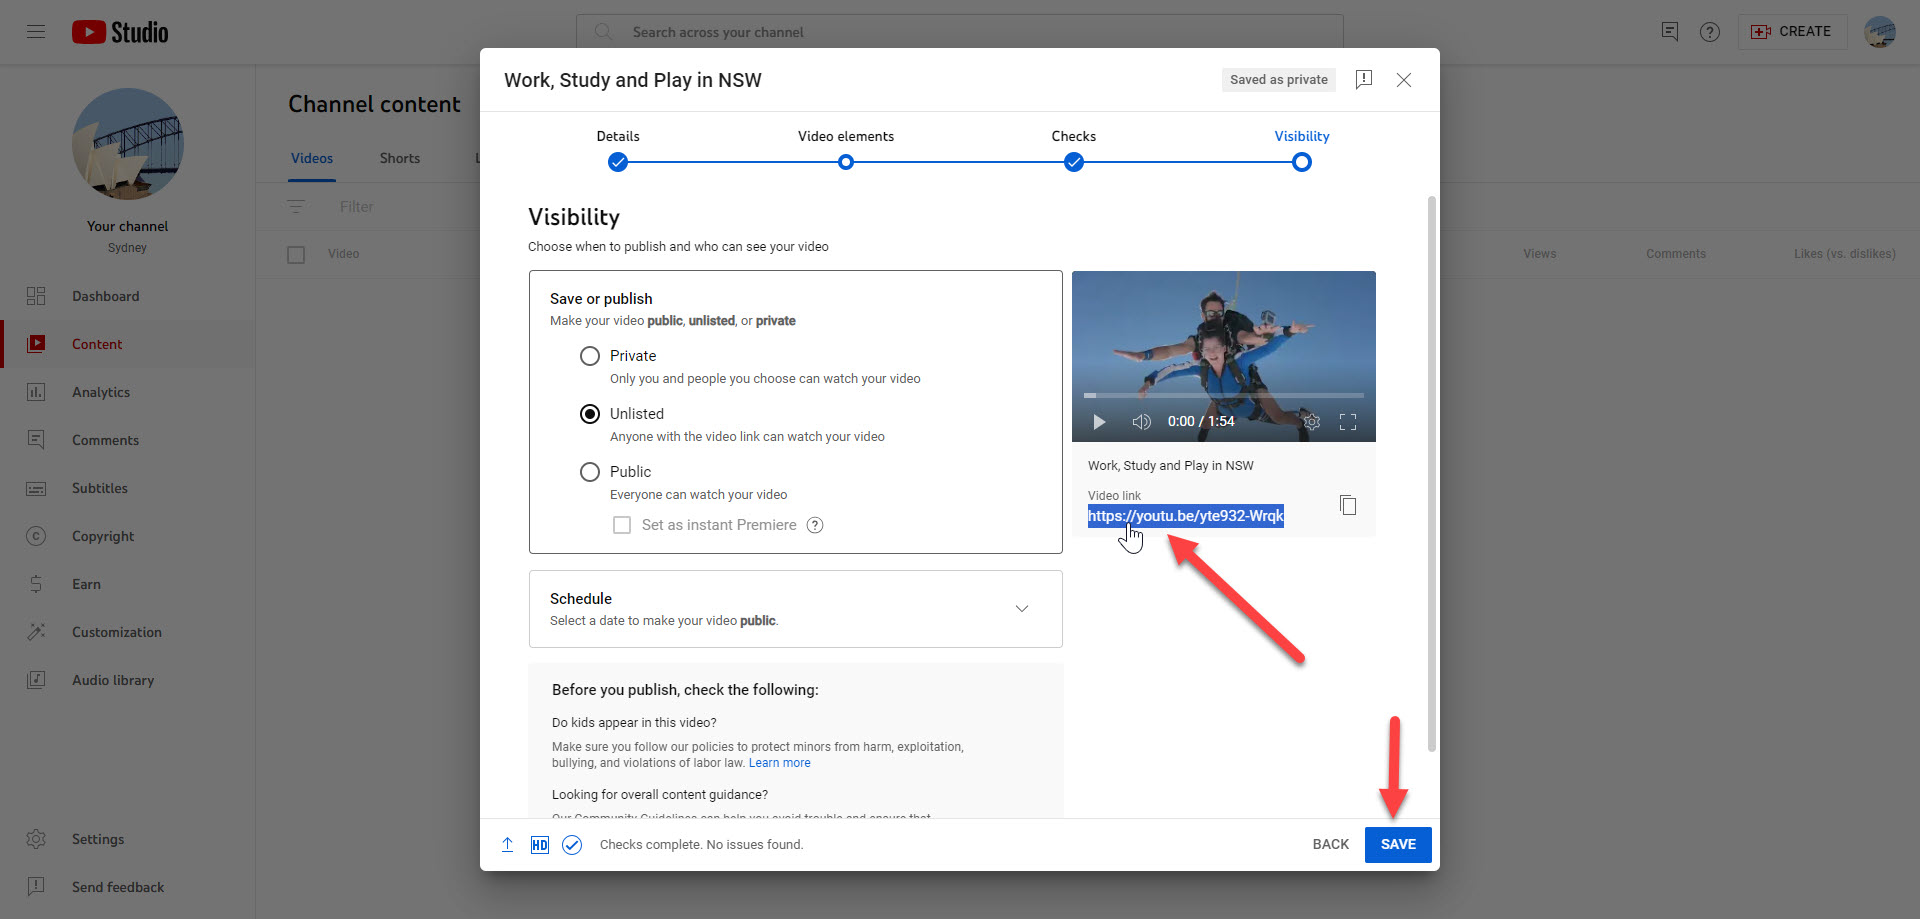
URL Generated
It is also on this screen that you will be provided the specific URL for your youtube. You can copy/save this now and select "SAVE". If you forget to copy it, it's okay, you can still copy it at the next screen, or open this video at any point and take the url.

You have now uploaded a Youtube Video!
Editing an existing Youtube video
Editing an existing Youtube video
You can edit any copy on a video, or the "visibility status" - but you cannot edit the video file itself.
Note: If the wrong video file is uploaded, you cannot switch it out, you'll need to upload a new video and provide a new URL. The platform won't let you do it (which is so users can't upload and switch content that generates a certain public response and then change the content later but keeping all the engagement and comments etc). There's no work around for this.
What you can do though is:
Edit the copy/visibility/description/thumbnail
Log into the right profile - either Sydney or Visit - if any issues, please review the "Log In" tab above.
If you werent provided the URL to the video head to the "Content' tab, selected from the far left of your Youtube page:
You can either search for your video if you know the name of it in the search bar at the top, or you can scroll down the list.
If viewing from this method, find your video and click on the little pencil icon for the "details"
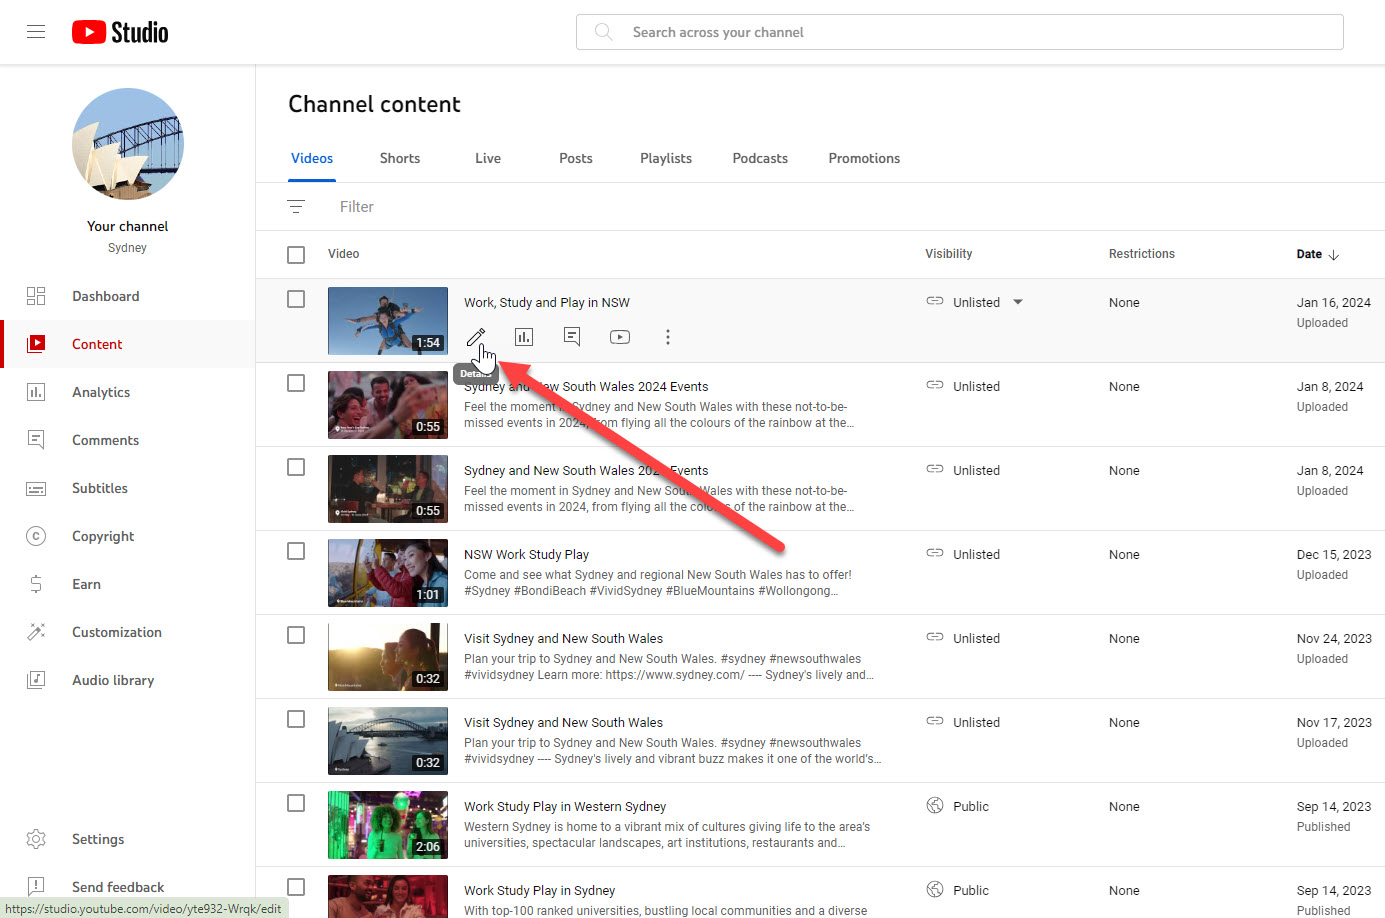
Change whatever is needed to be changed and hit "save" top right
If you were provided the specific video url, e.g. https://youtu.be/yte932-Wrqk, you can select the "edit video" button and edit it that way:

Building & Hosting a Competition on Sydney.com/Visitnsw.com
Building & Hosting a Competition on Sydney.com/Visitnsw.com
Building & Hosting a Competition on Sydney.com/Visitnsw.com
People who will action the work of building the competition/process it follows:
- Helene (builds the Salesforce Form)
- Millie (builds the website pages)
- Marcelo (adds the Salesforce Form to the website pages)
- Millie then sets the pages live & adds tiles if briefed to Homepage
People who should be initially flagged/notified via an Email of the work as a heads up of the Competition:
- Helene
- Millie + Jenny
- Marcelo + Nina
- Eloise + Sam
Key Components for a competition:
- Clear Prize + Dates + Comp Requirements
- A salesforce competition form created (you will need to brief in Helene Gabrielsson <helene.gabrielsson@dnsw.com.au>)
- 3 website pages briefed in to Website Content team + 3 viable image options for the header (you will need to brief in Millie Harvey <millie.harvey@dnsw.com.au>)
- If copy is required to be written, brief in Eloise from Editorial with the key information (Eloise Basuki <Eloise.Basuki@dnsw.com.au>)
- Dev work lodged (you will need to brief in Nina Malmstrom <nina.malmstrom@dnsw.com.au>)
- A list of where you’re requiring this to be promoted on either Sydney.com or Visitnsw.com (included on Millie's brief, CC: Jenny Gerada)
Turn-around time for Completion = 2 weeks.
- Helene = 1 week max minimum - 2 weeks is ideal
- Eloise = if copy is required, 3 days minimum
- Millie = 3 days minimum after being provided ALL assets, not partially provided
- Marcelo = 2 days (includes testing)
Step 1:
Send a heads up email to everyone (list of people above) that a comp is coming, what the dates are and what the turn-around time for work to be completed is.
Note: Millie & Helene can work at the same time separately, Marcelo will need everything completed before he can begin his part
Step 2:
Send the key info (bullet points below) via email to Helene. CC in Millie & Marcelo.
Mandatory Salesforce Components:
- List of new questions/fields for the form
- Who should be the owner of the Leads in Salesforce?
- Who should have access to the Leads in Salesforce?
- The URL to terms & conditions page (Millie can provide this before work commences)
Step 3:
Create a Monday.com form for Millie. Attach images and copy for each page. Millie will provide you with the URLs.
If you require copy to be written, you will need to brief in Eloise before briefing Millie.
Monday Form: https://forms.monday.com/forms/392ed437d267aa36b2e1d32bf30c7621?r=use1 | Select Activity Type: Miscellaneous Digital Requests
Please attach all comp images + copy to this form.
Specs:
Images = minimum of 3 x :
- 3200pxl width x 1800pxl height (can be larger – this is just the very smallest we can use)
- File format: .jpg / .jpeg
- No text or logo's on images
Copy:
Landing Page
- Introduction copy 25-30 words
- Prize inclusions paragraph
- Instructions on how to participate (if required)
Thank you Page
- We can just include generic “Thank you for participating, your entry has been submitted” copy unless you specify otherwise
Ts&Cs
- You will need your document approved by Neville, then provide the copy to Millie without any tracked changes, only provide the final approved copy in a word document via Sharepoint.
Step 4:
Helene to create a Jira Ticket for Dev Team, tag Millie in the description so she can provide the URLs.
Jira ticket: https://destinationnsw.atlassian.net/jira/software/c/projects/DRUPAL8/boards/145
Select: Drupal 8 Project | Issue Type: Task | Assignee: Nina | Provide: HTML code of Comp Form
Marcelo will then add the HTML code to the comp landing page and complete testing. He'll let Millie know when it's ready.
Step 5:
Millie will set the pages live & add the competition tile (if you have briefed it) onto the homepage